How to use MPCVault cards?
Welcome to our platform's card service. With this feature, you can easily allocate funds to multiple users, allowing your team or family to share the account while retaining individual control over card usage. You can use cryptocurrency to pay for various expenses anytime, anywhere.
Getting started
Before you can issue a card, you need to complete the KYC verification process. Only after passing this review will you be able to access the card page.
Completing KYC verification
-
Navigate to the Cards Menu: The org admin navigates to the Cards page and clicks "Get started" to enter the KYC page.
-
Submit Required Documents: Upload all necessary documents and details as prompted. A fee of $10 USD will be charged for verification processing.
-
Await Approval: The verification process may take some time. The card feature will be enabled once the review is complete.
Depositing funds
After passing the KYC verification, you can access the cards menu. At this point, you can start topping up your account balance to prepare for creating virtual cards.
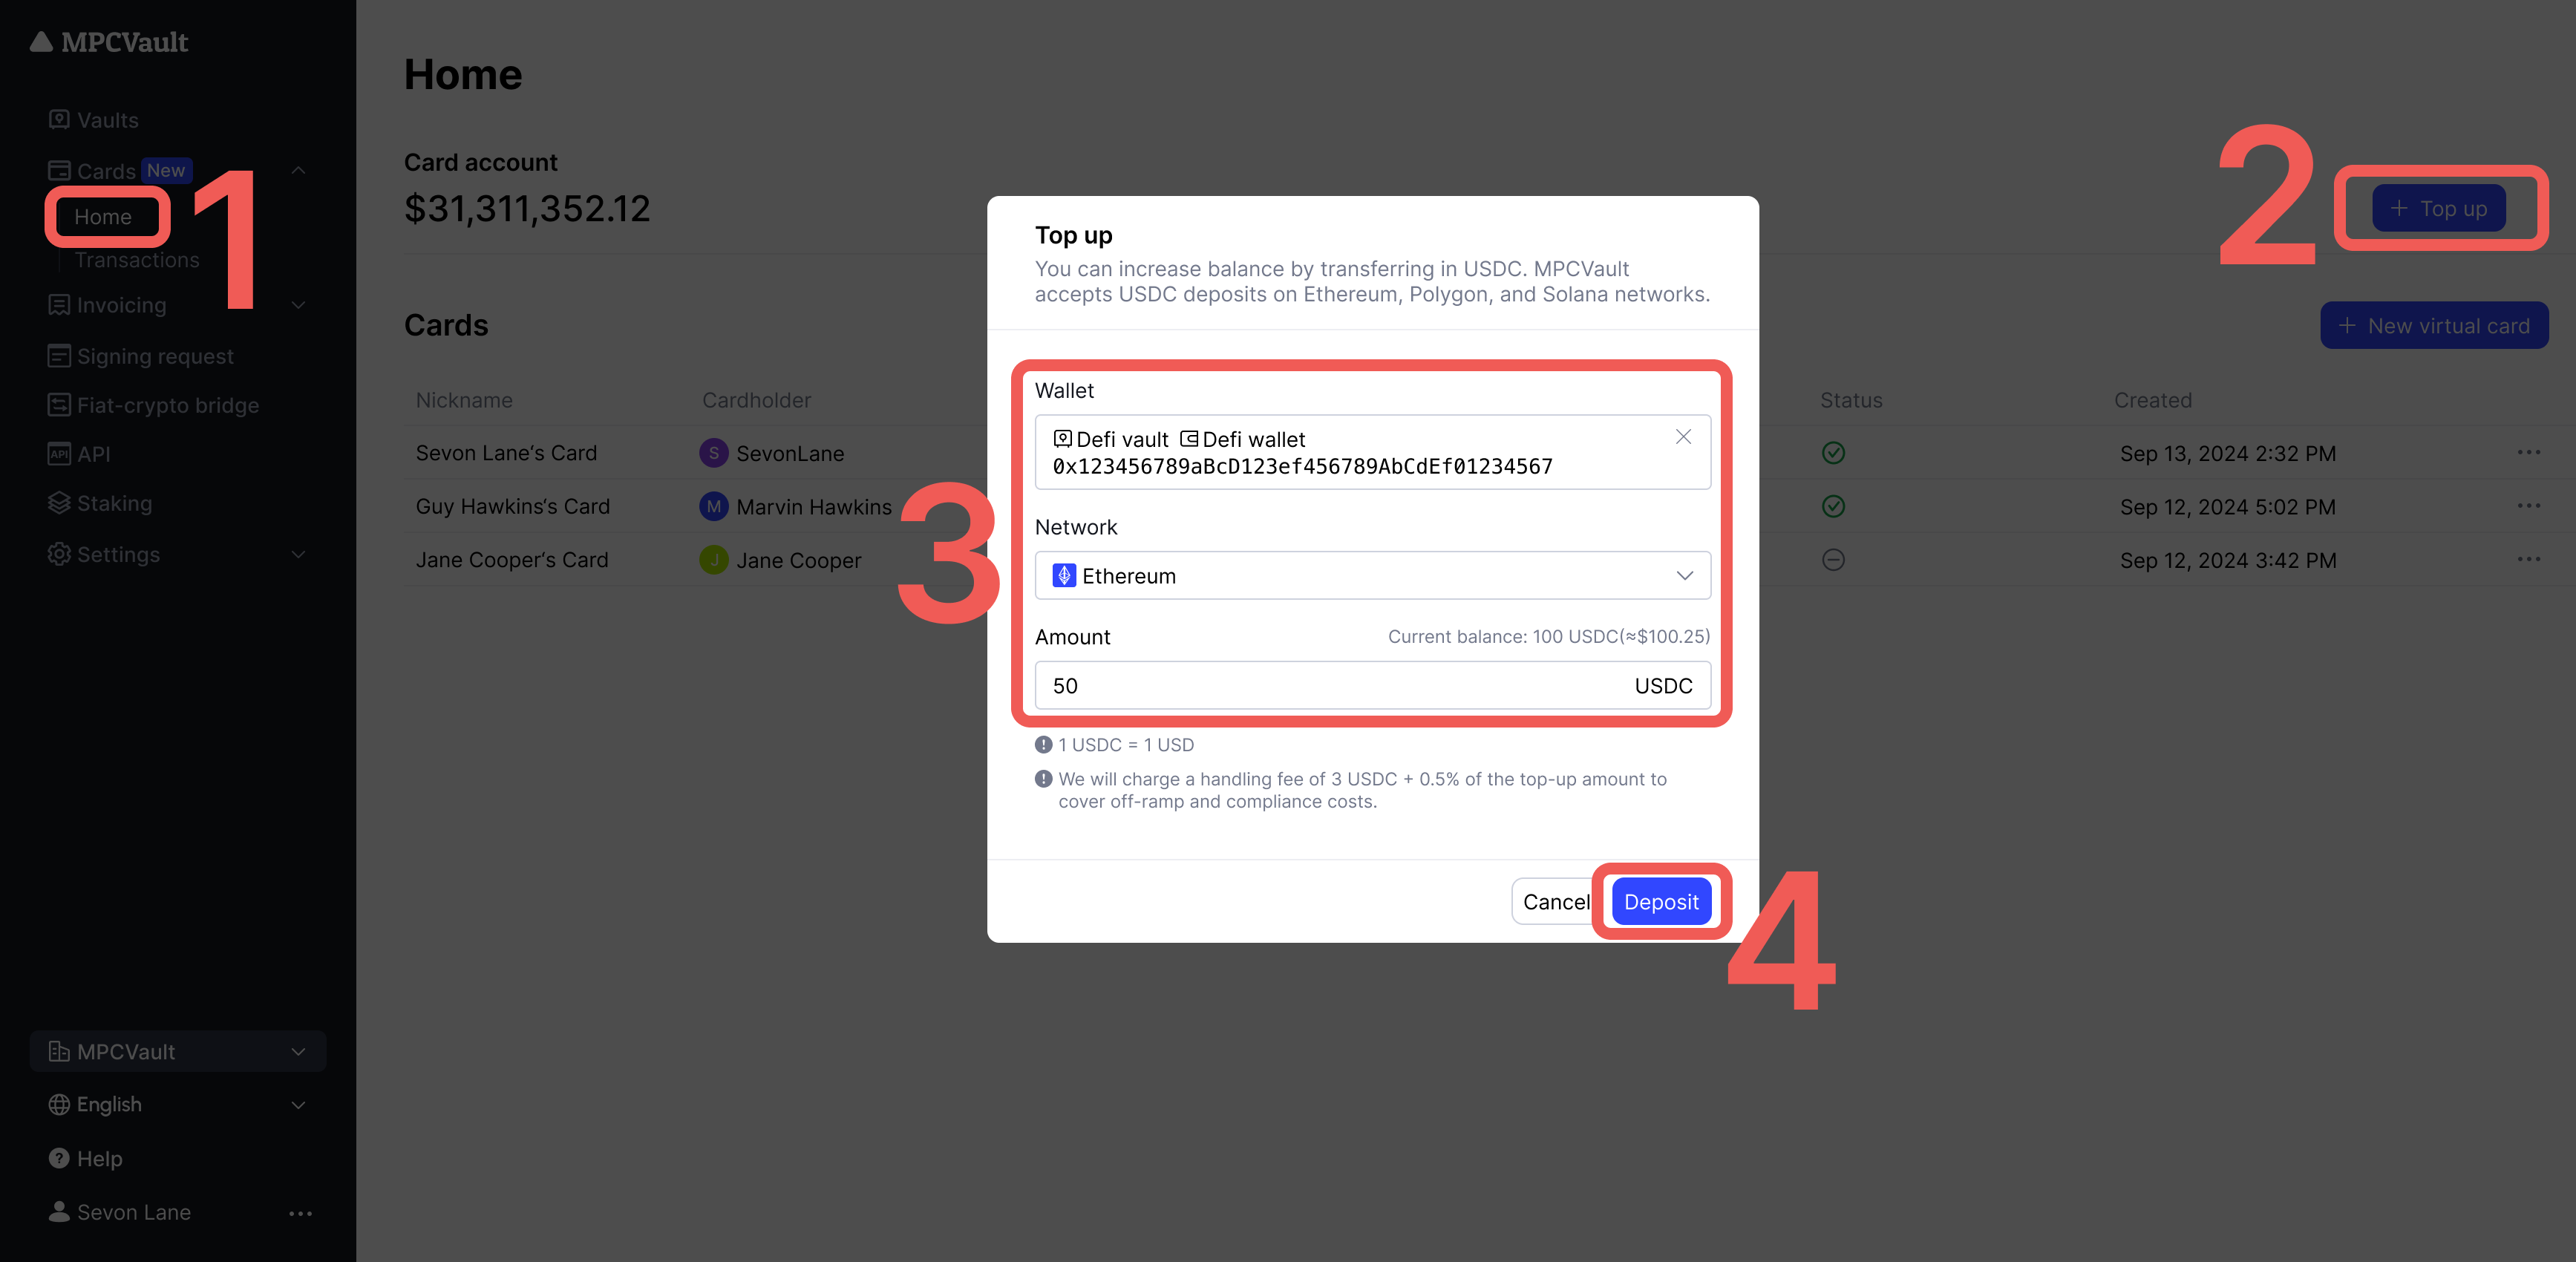
Top up via web
-
Navigate to the Cards Menu: Select the "Home" page under the cards menu and click the "+ Top Up" button at the top right corner.
-
Select Wallet and Network: After the " Top Up " window pops up, choose the wallet and network you want to use. We support top-ups using USDC on the Ethereum, Polygon, and Solana networks.
-
Enter Top-up Amount: A fee of 3 USDC plus 0.5% of the deposit amount will be charged for each top-up to cover transfer and compliance costs. To ensure successful addition of funds to your card account, please deposit sufficient funds.
-
Confirm and Complete Top-up: After verifying the information, click the "Deposit" button to complete the operation.
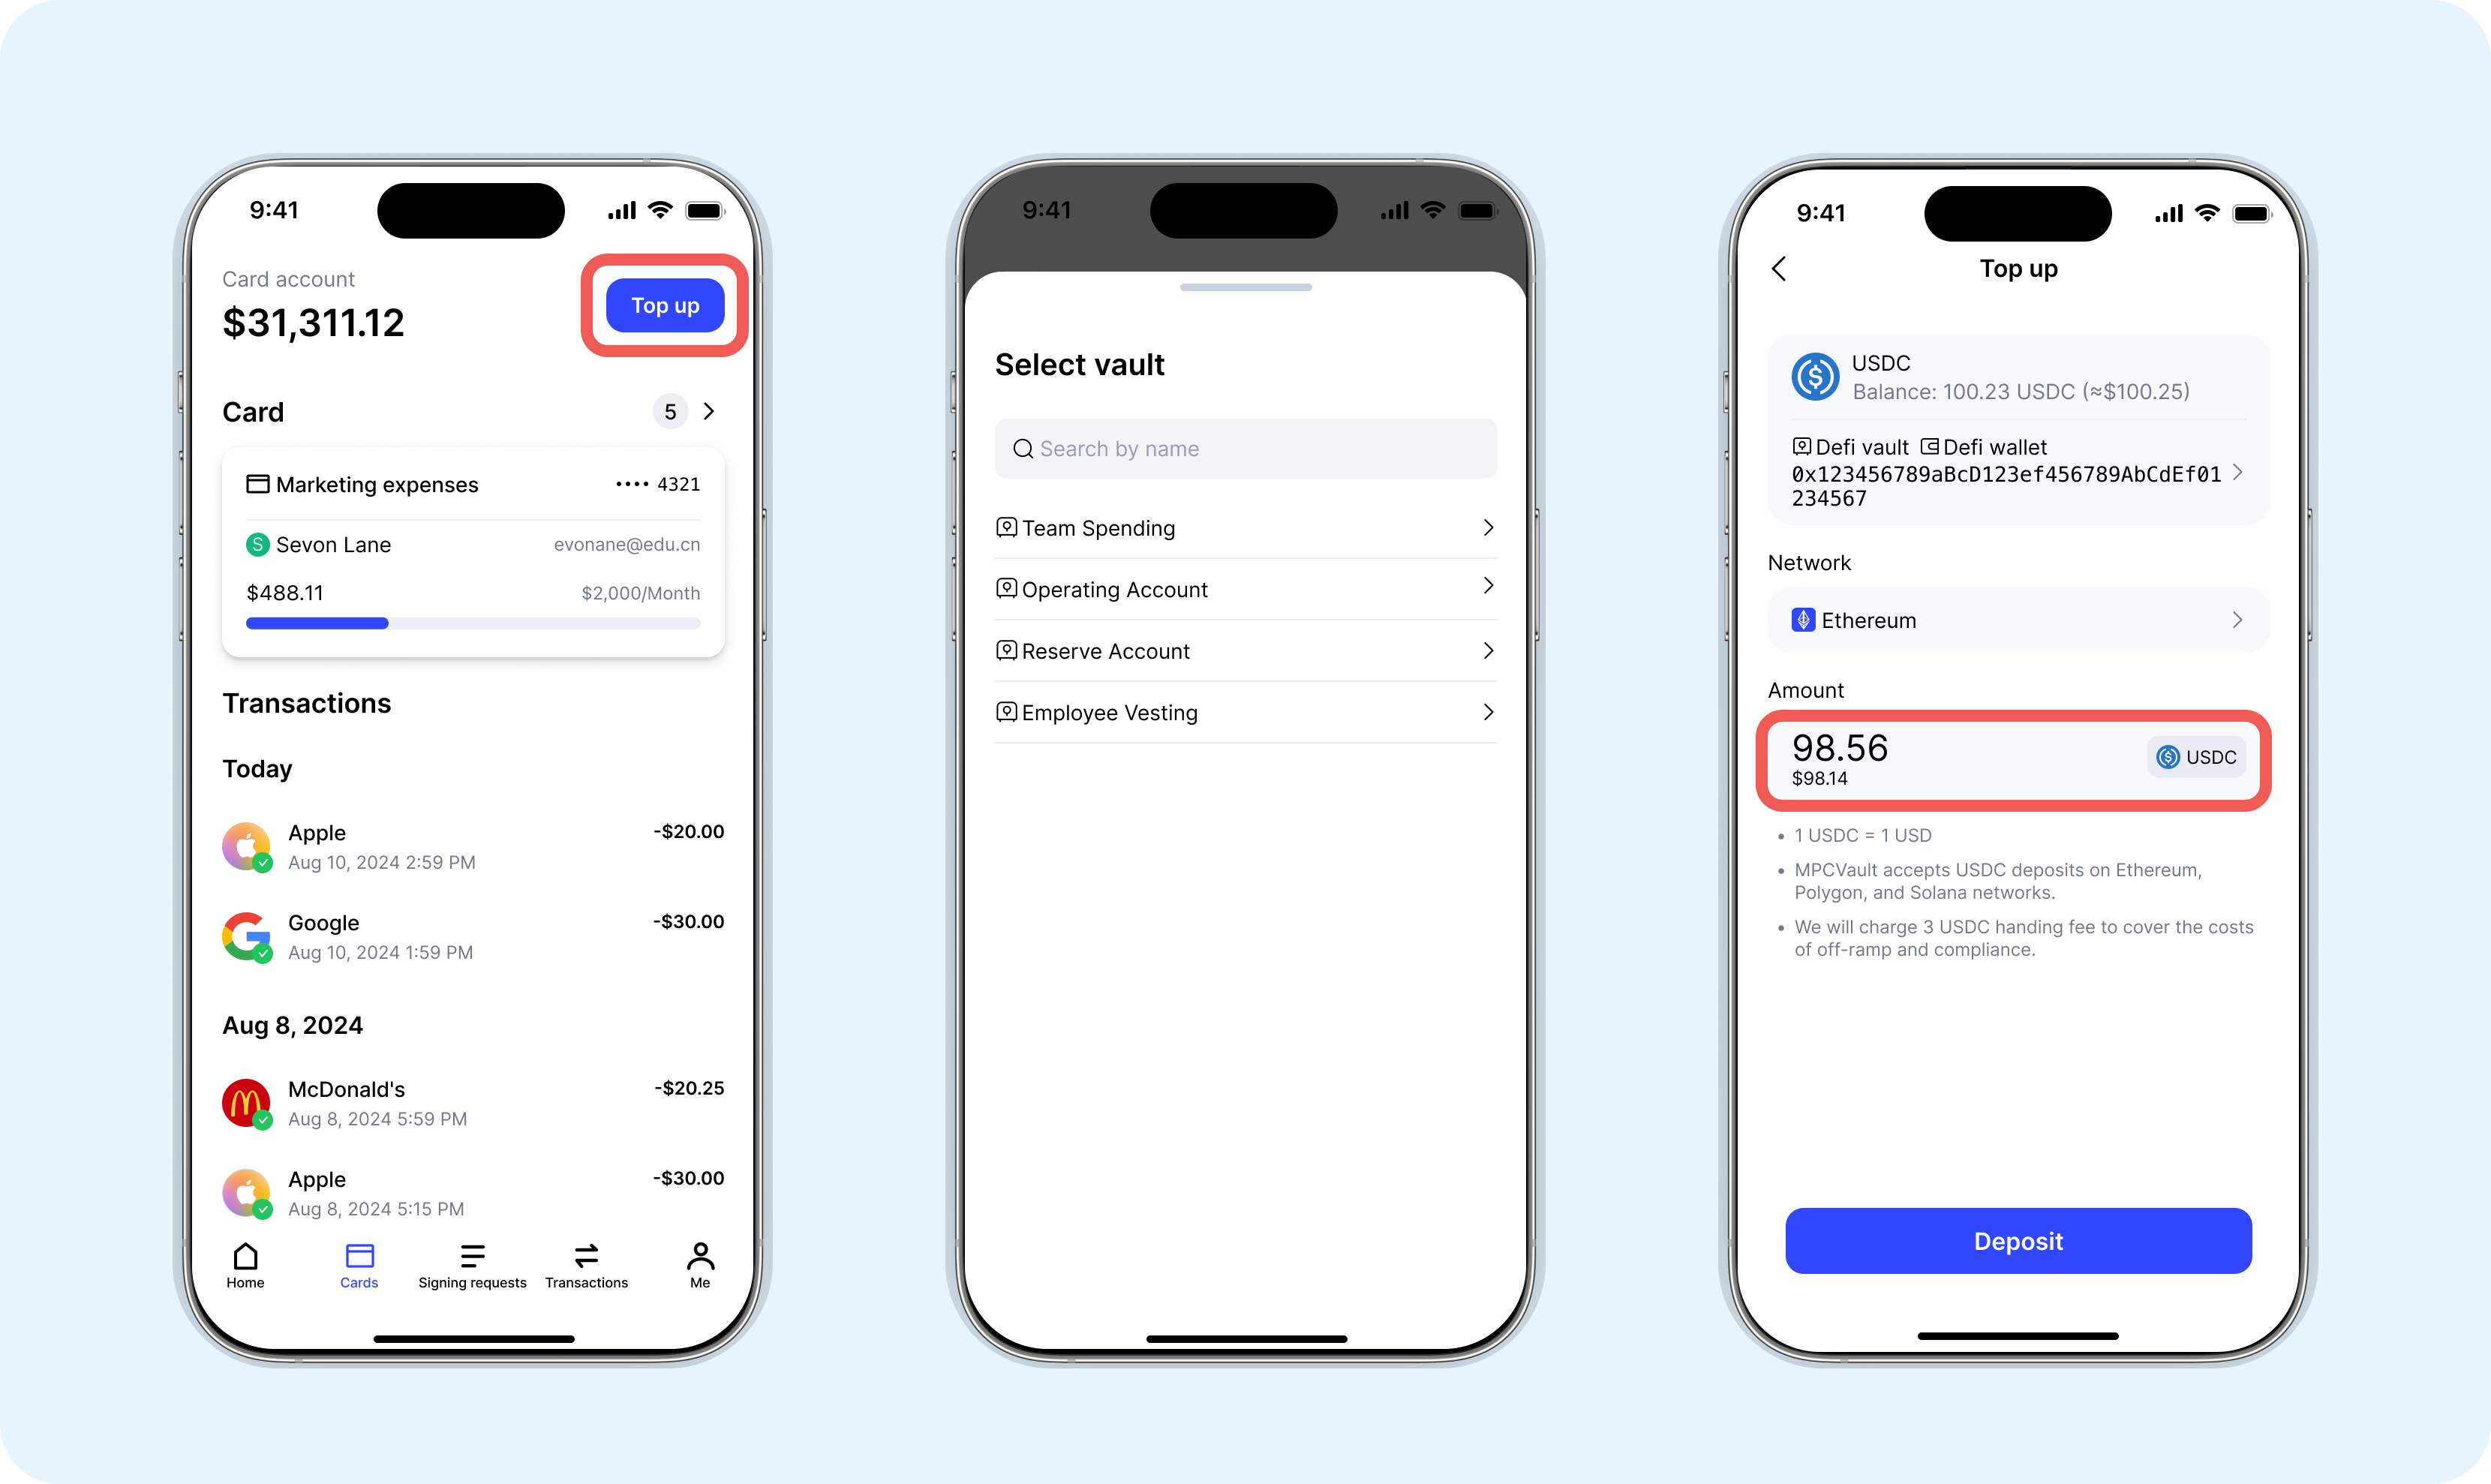
Top up via mobile app
-
Open the App: Open the MPCVault app on your mobile phone.
-
Navigate to the Card Page: Go to the "�Card" page and tap the "Top Up" button in the top right corner.
-
Select Vault and Wallet: Choose the vault and wallet you want to use.
-
Choose Network and Enter Amount: Select the desired network (Ethereum, Polygon, or Solana) and enter the top-up amount. There’s a fee of 3 USDC plus 0.5% of the deposit amount, so make sure your top-up exceeds that.
-
Complete the Top-up: Tapping the "Deposit" button will redirect you to a signing request. Please sign this request to complete the top-up.
By following these simple steps, you can effortlessly add funds to your account whether you're using our web platform or mobile app.
It may take a few minutes for the funds to be credited after a top-up.
Creating cards
Once you have sufficient account balance, you can create new virtual cards as needed. Please follow the steps below:
-
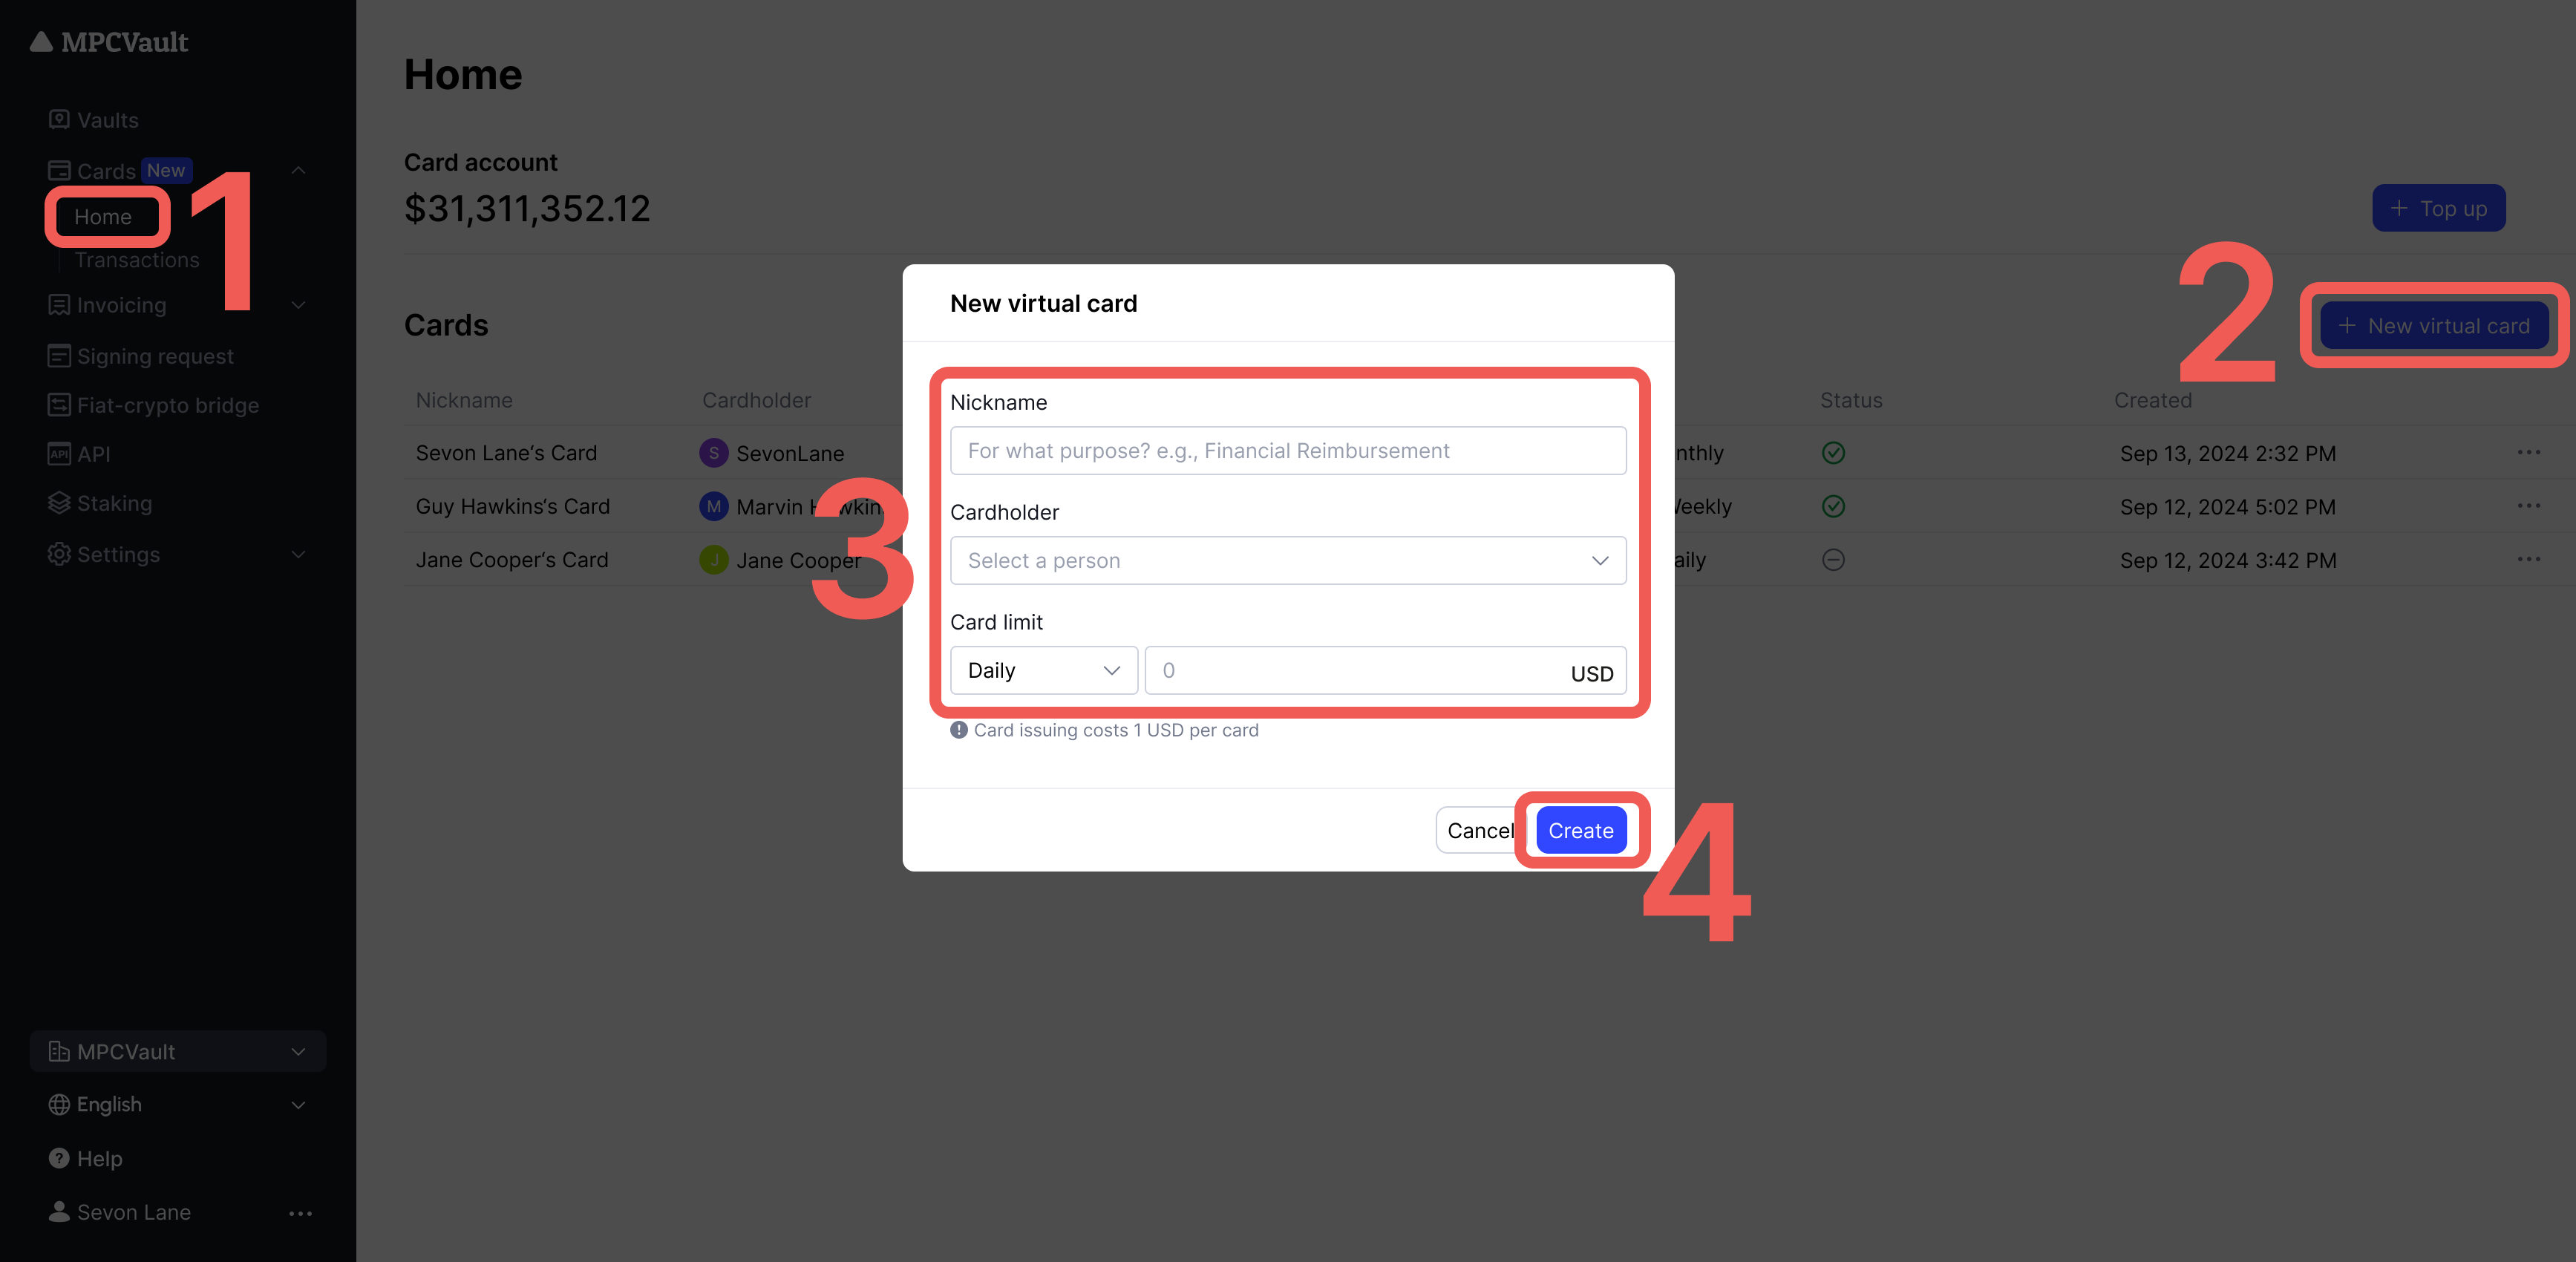
Navigate to the Cards Menu: Select the "Home" page under the Cards menu and click the "+ New Virtual Card" button.
-
Fill in Card Information: In the pop-up window for creating a new card, enter the necessary information, including the card nickname and card limit.
-
Confirm Fees: A fee of 1 USDC will be charged for each new card. Please ensure your account balance is sufficient.
-
Complete Creation: After filling in the details, click the "Create" button.
By following the above steps, you can successfully create new virtual cards. There is no limit to the number of cards you can create, allowing you to generate as many as needed.
Using your card
Once you have your MPCVault Card, you can use it in various ways:
- Global Spending and Mobile Wallets: Use your MPCVault Card to spend in any currency at 90 million merchants worldwide. Add it to Apple Pay, Google Pay, and AliPay for convenient in-store purchases.
- Online Shopping: Use your MPCVault Card for online transactions on platforms like Amazon, eBay, or other e-commerce websites.
- Subscription Services: Pay for digital subscriptions such as Netflix, Spotify, or cloud storage services.
- Travel Expenses: Book flights, hotels, or rental cars using your card.
- Digital Services: Cover fees for services like ChatGPT, Shopify, or web hosting.
In essence, the MPCVault Card functions similarly to a traditional bank card, offering flexibility and convenience for you.
Deactivating cards
If a card is no longer needed, the org admin can deactivate it at any time. Please follow the steps below:
-
Navigate to the Cards Menu: Find the card you want to deactivate in the cards list on the Home page.
-
Select Deactivation Option: Click the "..." menu on the right side. Choose "Deactivate" from the pop-up options.
-
Confirm Deactivation: A confirmation prompt will pop up. Confirming this will deactivate the card.
Card Transactions
Viewing transaction records
To better manage and track each transaction, the platform provides comprehensive transaction records. By viewing these records, you can clearly understand account activities, including deposits and expenditures.
Steps to view transaction records
-
Navigate to the Cards Menu: Select the "Transactions" page.
-
View Records: The page will display all transaction records in a list format, including deposits, expenditures, and other details.
-
View Details and Add Notes: Click on a single record, and a "Details" pop-up will appear on the right. You can view specific details of the transaction and add notes to it.
Transaction Statuses
Here are the common transaction statuses you may see when using MPCVault cards:
| Status | Description | Note |
|---|---|---|
| ⏳ Pending | Transaction successful but not yet fully settled. | The funds have been authorized and will typically change to "Completed" after a set period. |
| ✅ Completed | Transaction successful and fully settled; funds deducted from your card. | Usually irrevocable (if a refund occurs after completion, a new credit record will be generated). |
| ❌ Failed | The transaction was unsuccessful. No funds were deducted. | Common reasons include: insufficient balance, high-risk merchant transactions, network issues, etc. |
Card fees
Card fees mainly include the following:
- KYB Fee: $10 USD
- Virtual card issuance fee: $1 USD per card
- Crypto deposit processing and gas fee: 3 USDC plus 0.5% of the deposit amount per deposit.
- International Transactions: Up to 3%, depending on the transaction location. No transaction fee applies for USD transactions with U.S. merchants.
- Transaction Disputes: $35 per case.
If you encounter any issues while using the card, please contact our technical support team.
High-Risk Merchant Categories
Certain Merchant Category Codes (MCCs) are considered high-risk due to the nature of their associated businesses. Transactions made with merchants under these MCCs may occasionally be declined to ensure compliance with regulatory and security standards. Below is a list of the blocked MCCs for your reference:
| MCC | Category |
|---|---|
| 2892 | Explosives |
| 3484 | Armas de pequeño calibre |
| 4829 | WIRE TRANSFER - MONEY ORDER |
| 5122 | Drugs, Drug proprietaries, druggiest sundries |
| 5542 | Automated fuel dispenders |
| 5681 | FURRIERS AND FUR SHOPS |
| 5816 | Digital Goods - games for transactions involving skilled game wagering (daily fantasy sports) |
| 5932 | ANTIQUE SHOPS |
| 5933 | PAWN SHOPS |
| 5937 | ANTIQUE REPRODUCTIONS |
| 5944 | JEWELRY STORES |
| 5960 | Direct marketing - Insurance |
| 5962 | Direct marketing - travel related arrangement services |
| 5964 | Direct marketing - catalog merchants |
| 5965 | Direct Marketing—Combination Catalog and Retail Merchants |
| 5966 | Direct marketing - Outbound telemarketing merchants |
| 5967 | Direct Marketing - Inbound Telemarketing merchants |
| 5969 | Direct Marketing/Direct Marketers (Not elsewhere classified) |
| 5972 | STAMP & COIN STORES |
| 5993 | Cigar stores and stands |
| 6010 | FINANCIAL INSTITUTIONS - MANUAL CASH DISBURSEMENTS |
| 6011 | FINANCIAL INSTITUTIONS - AUTOMATED CASH DISBURSEMENTS |
| 6012 | FINANCIAL INSTITUTIONS - MERCHANDISE & SERVICES |
| 6050 | QUASI CASH - MEMBER FINANCIAL INSTITUTION |
| 6051 | QUASI CASH |
| 6211 | SECURITY BROKERS/DEALERS |
| 6529 | REMOTE STORED VALUE LOAD-MEMBER FINANCIAL INSTITUTION |
| 6530 | REMOTE STORED VALUE LOAD - MERCHANT |
| 6531 | PAYMENT SERVICE PROVIDER - MONEY TRANSFER |
| 6532 | PAYMENT TRANSACTION - MEMBER FINANCIAL I |
| 6533 | PAYMENT TRANSACTION - MERCHANT |
| 6534 | MONEY TRANSFER - MEMBER FINANCIAL INSTITUTION |
| 6535 | VALUE PURCHASE - MEMBER FINANCIAL INSTITUTION |
| 6536 | MONEYSEND INTRACOUNTRY |
| 6537 | MASTERCARD MONEY SEND INTERCOUNTY |
| 6538 | MASTERCARD MONEYSEND FUNDING TRANSACTION |
| 6540 | POI FUNDING TRANSACTIONS |
| 6555 | MASTERCARD INITIATED REBATE/REWARDS |
| 6611 | OVERPAYMENTS |
| 6760 | SAVINGS BONDS |
| 7272 | ESCORT SERVICES |
| 7273 | DATING OR ESCORT SERVICES |
| 7280 | HOSPITAL PATIENT PERSONAL FUNDS WITHDRAW |
| 7322 | DEBT COLLECTION AGENCIES |
| 7800 | GOVERNMENT - OWNED LOTTERIES |
| 7801 | GOVERNMENT LICENSED CASINOS (ONLINE GAMBLING) |
| 7802 | GOVERNMENT LICENSED HORSE/DOG RACING |
| 7948 | Organización de carreras |
| 7995 | Betting, including lottery tickets, casino gaming chips, off-track betting, wagers at race tracks and games of chance to win prizes of monetary value |
| 8631 | Labor Unions |
| 8651 | Political Organizations |
| 8661 | Religious organizations |
| 9223 | Bail and bond payments |
| 9401 | I-PURCHASING PILOT |
| 9405 | Intra-Government Purchases (Government only) |
| 9411 | GOVERNMENT LOAN PAYMENTS |
| 9700 | International Automated Referral Service (Visa use only) |
| 9701 | Visa Credential Server (Visa use only) |
| 9702 | GCAS Emergency Services (Visa use only) |
| 9721 | Asuntos internacionales (embajadas) |
| 9754 | GAMBLING-HORSE RACING,DOG RACING,STATELOT |
| 9950 | Intra-Company Purchases |
| 6531 | PYMT SVC PROV - MONEY TRANSFER FOR A PURCHASE |
| 6532 | PYMT SVC PROV - MEMBER FIN INSTITUTION - PYMT TRAN |
| 6533 | PYMT SVC PROV - MERCHANT - PYMT TRAN |
| 7297 | MASSAGE PARLORS |
| 7995 | BETTING/TRACK/CASINO/LOTTO |