> ## Documentation Index
> Fetch the complete documentation index at: https://docs.mpcvault.com/llms.txt
> Use this file to discover all available pages before exploring further.
# API Setup Guide
> Complete guide to setting up API access and programmatic signing with MPCVault.
This guide walks you through setting up API access for MPCVault. You can start with just an API token and add the client signer later if you need automated signing.
## Choose Your Setup
**Start here** — all integrations begin with an API token.
* Create and manage wallets
* Query balances and history
* Create signing requests
* Transactions approved manually in app
**Add later** — when you need automation.
* Everything from API Token, plus:
* Execute transactions programmatically
* Automated approval based on your logic
* No manual intervention required
```mermaid theme={null}
flowchart LR
A[Create API Token] --> B{Need automation?}
B -->|No| C[Done! Use manual approval]
B -->|Yes| D[Add Client Signer]
D --> E[Full automation]
```
***
## API Token Only (Manual Approval)
With just an API token, you can build integrations where transactions are approved manually by team members in the MPCVault mobile app.
**Capabilities:**
* Create and list wallets
* Query balances and transaction history
* Create signing requests
* Monitor transaction status
**Signing flow:**
```mermaid theme={null}
sequenceDiagram
participant App as Your App
participant API as MPCVault API
participant Mobile as MPCVault App
participant Chain as Blockchain
App->>API: POST /signing-requests (create)
API-->>App: { uuid: "abc-123", status: "pending" }
Note over Mobile: Team member reviews
Mobile->>API: Approve & Sign
API->>Chain: Broadcast Transaction
App->>API: GET /signing-requests/abc-123
API-->>App: { status: "completed", tx_hash: "0x..." }
```
**Best for:** Treasury operations, high-value transfers, or any workflow requiring human review.
***
## API Token + Client Signer (Automated Signing)
Adding a client signer enables fully automated transaction execution without manual approval. The client signer runs on your infrastructure and programmatically approves transactions based on your business logic.
**Additional capabilities:**
* Execute signing requests programmatically
* Build automated payment workflows
* Handle high-frequency operations
* Implement scheduled transactions
**Signing flow:**
```mermaid theme={null}
sequenceDiagram
participant App as Your App
participant API as MPCVault API
participant Signer as Client Signer
participant Chain as Blockchain
App->>API: POST /signing-requests/execute
API->>Signer: Callback (SigningRequest protobuf)
Note over Signer: Your logic decides
Signer-->>API: HTTP 200 (approve)
API->>Chain: Broadcast Transaction
API-->>App: { tx_hash: "0x...", status: "completed" }
```
**Best for:** Automated payroll, programmatic trading, deposit sweeping, or any high-volume operation.
***
## Part 1: Create an API User (Required)
Every API integration starts with creating an API user and obtaining a token.
### Step 1: Create the API user
1. Go to [console.mpcvault.com](https://console.mpcvault.com).
2. Navigate to the **API** page (org admin required).
3. Click **Create an API user**.
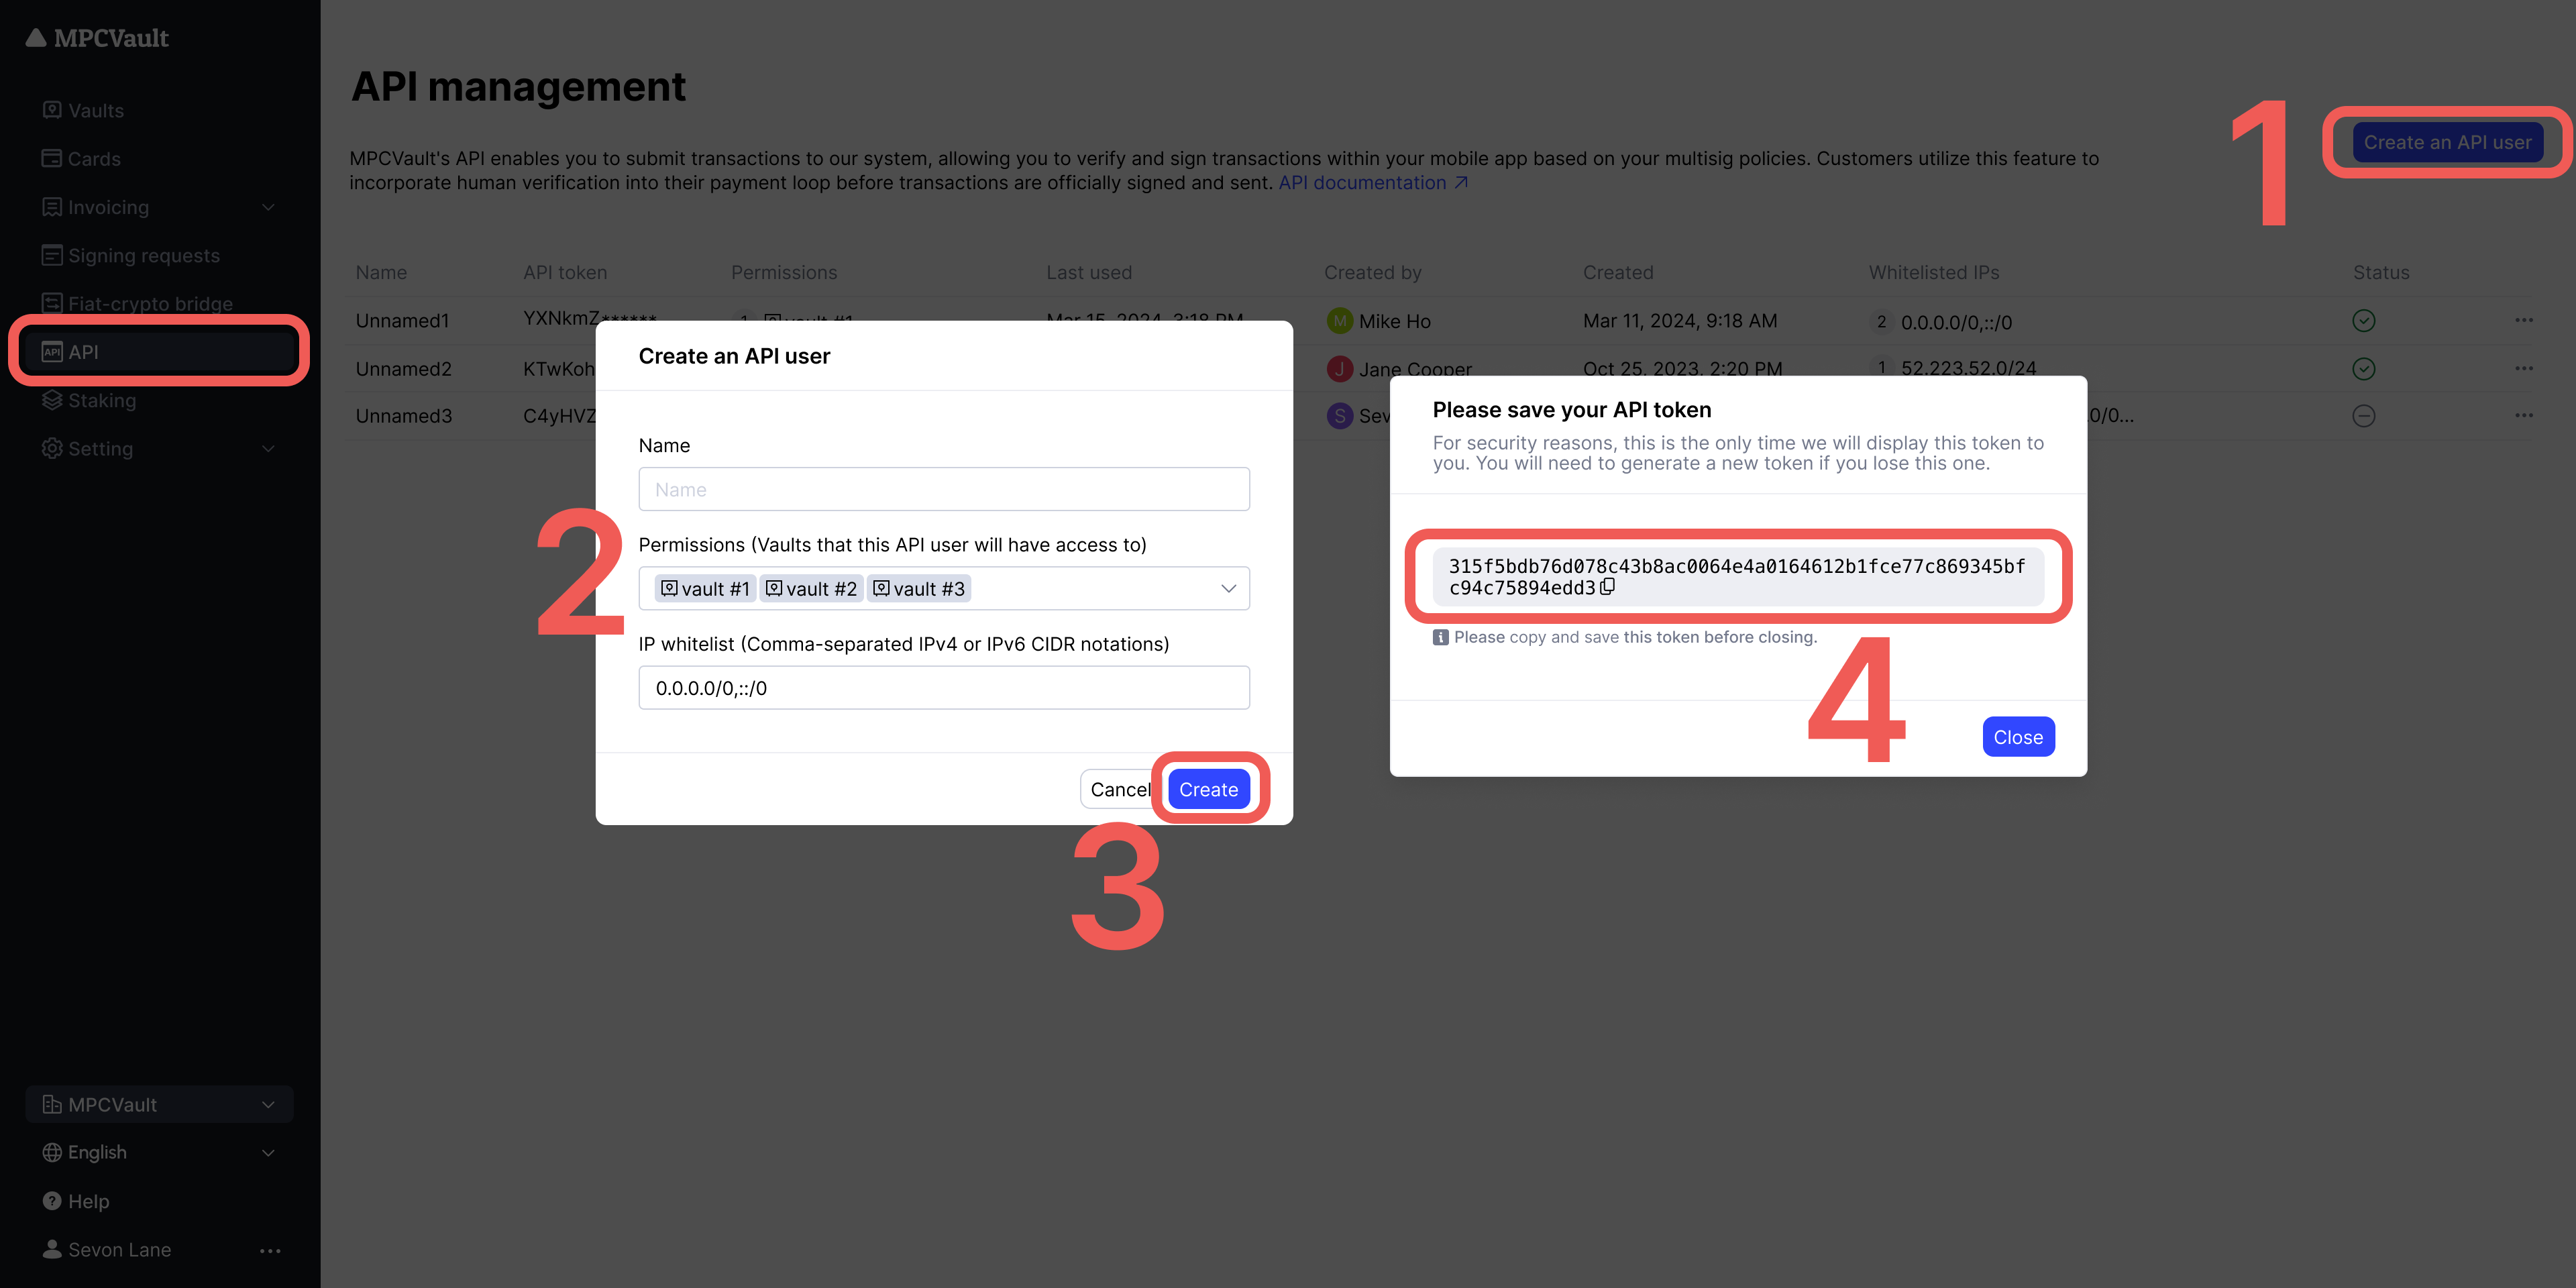 4. Fill in the required fields:
| Field | Description |
| ------------ | ------------------------------------------------------------------------------ |
| Name | Unique identifier for this API user (must be unique within the organization) |
| Permission | Select which vaults this API user can access |
| IP Whitelist | (Optional) Restrict access to specific IP addresses (up to 3, comma-separated) |
5. Click **Create** to generate the API user.
### Step 2: Save your API token
After creation, a popup displays your API token. **Copy and save it immediately.**
You cannot retrieve the full API token again. If you lose it, you must generate a new one.
### Step 3: Test your token
Verify your token works by making a test request:
```bash theme={null}
curl -X POST https://api.mpcvault.com/v1/getWalletList \
-H "Content-Type: application/json" \
-H "x-mtoken: YOUR_API_TOKEN" \
-d '{"vaultUuid": "your-vault-uuid","page":"0","limit":"10"}'
```
### What you can do now
| Operation | Endpoint | Requires Client Signer? |
| ------------------------ | -------------------------------- | ----------------------- |
| List wallets | `GET /wallets` | No |
| Get balances | `GET /wallets/{id}/balance` | No |
| Create wallets | `POST /wallets` | No |
| Create signing requests | `POST /signing-requests` | No (approved manually) |
| Execute signing requests | `POST /signing-requests/execute` | **Yes** |
**Example code and SDKs:** [GitHub repository](https://github.com/mpcvault/mpcvaultapis/tree/main/examples)
If you only need manual approval for transactions, you're done here. Continue to [Part 2](#part-2-set-up-the-client-signer-optional) only if you need automated signing.
***
## Part 2: Set Up the Client Signer (Optional)
**Skip this section** if you only need manual transaction approval via the MPCVault app.
The client signer enables fully automated transaction signing without manual approval. It's a Docker container that runs on your infrastructure and programmatically approves transactions based on your business logic.
Complete guide to setting up the client signer, including key generation, Docker deployment, and callback handler implementation.
***
## Custom EVM Chains
To send transactions on custom EVM chains via API:
### 1. Add the chain to your vault
1. Go to [console.mpcvault.com](https://console.mpcvault.com/)
2. Navigate to the vault's **Custom EVM networks** menu
3. Add the chain with: chain ID, RPC URL, block explorer URL
### 2. Add ERC20 tokens (if needed)
1. Navigate to the vault's **Token list** menu
2. Add tokens by contract address
### 3. Set required parameters
For custom EVM chains, you **must** explicitly provide:
| Parameter | Description | Why Required |
| --------- | --------------------------- | -------------------------------- |
| `nonce` | Transaction sequence number | MPCVault can't query custom RPCs |
| `gas_fee` | Gas price and limit | Network conditions vary |
```json theme={null}
{
"chain_id": "43114",
"to_address": "0x...",
"value": "1000000000000000000",
"nonce": 42,
"gas_fee": {
"gas_limit": "21000",
"max_fee_per_gas": "25000000000",
"max_priority_fee_per_gas": "1000000000"
}
}
```
***
## Troubleshooting
| Issue | Cause | Solution |
| ------------------ | -------------------------- | --------------------------- |
| `401 Unauthorized` | Invalid or expired token | Regenerate token in console |
| `403 Forbidden` | No access to vault | Check API user permissions |
| `404 Not Found` | Wrong endpoint or resource | Verify API endpoint and IDs |
For client signer troubleshooting, see the [Client Signer Setup](/guides/18-how-to-enable-api/client-signer#troubleshooting) guide.
4. Fill in the required fields:
| Field | Description |
| ------------ | ------------------------------------------------------------------------------ |
| Name | Unique identifier for this API user (must be unique within the organization) |
| Permission | Select which vaults this API user can access |
| IP Whitelist | (Optional) Restrict access to specific IP addresses (up to 3, comma-separated) |
5. Click **Create** to generate the API user.
### Step 2: Save your API token
After creation, a popup displays your API token. **Copy and save it immediately.**
You cannot retrieve the full API token again. If you lose it, you must generate a new one.
### Step 3: Test your token
Verify your token works by making a test request:
```bash theme={null}
curl -X POST https://api.mpcvault.com/v1/getWalletList \
-H "Content-Type: application/json" \
-H "x-mtoken: YOUR_API_TOKEN" \
-d '{"vaultUuid": "your-vault-uuid","page":"0","limit":"10"}'
```
### What you can do now
| Operation | Endpoint | Requires Client Signer? |
| ------------------------ | -------------------------------- | ----------------------- |
| List wallets | `GET /wallets` | No |
| Get balances | `GET /wallets/{id}/balance` | No |
| Create wallets | `POST /wallets` | No |
| Create signing requests | `POST /signing-requests` | No (approved manually) |
| Execute signing requests | `POST /signing-requests/execute` | **Yes** |
**Example code and SDKs:** [GitHub repository](https://github.com/mpcvault/mpcvaultapis/tree/main/examples)
If you only need manual approval for transactions, you're done here. Continue to [Part 2](#part-2-set-up-the-client-signer-optional) only if you need automated signing.
***
## Part 2: Set Up the Client Signer (Optional)
**Skip this section** if you only need manual transaction approval via the MPCVault app.
The client signer enables fully automated transaction signing without manual approval. It's a Docker container that runs on your infrastructure and programmatically approves transactions based on your business logic.
Complete guide to setting up the client signer, including key generation, Docker deployment, and callback handler implementation.
***
## Custom EVM Chains
To send transactions on custom EVM chains via API:
### 1. Add the chain to your vault
1. Go to [console.mpcvault.com](https://console.mpcvault.com/)
2. Navigate to the vault's **Custom EVM networks** menu
3. Add the chain with: chain ID, RPC URL, block explorer URL
### 2. Add ERC20 tokens (if needed)
1. Navigate to the vault's **Token list** menu
2. Add tokens by contract address
### 3. Set required parameters
For custom EVM chains, you **must** explicitly provide:
| Parameter | Description | Why Required |
| --------- | --------------------------- | -------------------------------- |
| `nonce` | Transaction sequence number | MPCVault can't query custom RPCs |
| `gas_fee` | Gas price and limit | Network conditions vary |
```json theme={null}
{
"chain_id": "43114",
"to_address": "0x...",
"value": "1000000000000000000",
"nonce": 42,
"gas_fee": {
"gas_limit": "21000",
"max_fee_per_gas": "25000000000",
"max_priority_fee_per_gas": "1000000000"
}
}
```
***
## Troubleshooting
| Issue | Cause | Solution |
| ------------------ | -------------------------- | --------------------------- |
| `401 Unauthorized` | Invalid or expired token | Regenerate token in console |
| `403 Forbidden` | No access to vault | Check API user permissions |
| `404 Not Found` | Wrong endpoint or resource | Verify API endpoint and IDs |
For client signer troubleshooting, see the [Client Signer Setup](/guides/18-how-to-enable-api/client-signer#troubleshooting) guide.