> ## Documentation Index
> Fetch the complete documentation index at: https://docs.mpcvault.com/llms.txt
> Use this file to discover all available pages before exploring further.
# Client Signer Setup
> Set up the client signer for automated, programmatic transaction signing.
**Skip this page** if you only need manual transaction approval via the MPCVault app. The client signer is only required for automated signing.
The client signer is a Docker container that:
1. Maintains a secure connection to MPCVault
2. Receives signing callbacks when you call `ExecuteSigningRequests`
3. Approves transactions based on your callback server's response
## Prerequisites
* Docker (or Docker Compose) installed
* A server with a stable internet connection
* A callback endpoint on your backend to receive and approve signing requests
* An [API user already created](/guides/18-how-to-enable-api/index)
## Step 1: Generate an Ed25519 Key Pair
The client signer authenticates with MPCVault using an Ed25519 key pair. Generate one locally:
```bash theme={null}
# Generate the key pair
ssh-keygen -t ed25519 -C "mpcvault-client-signer" -f ./client-signer-key -N ""
# View the public key (you'll need this for MPCVault console)
cat ./client-signer-key.pub
# View the private key (you'll need this for config.yml)
cat ./client-signer-key
```
The public key looks like:
```
ssh-ed25519 AAAAC3NzaC1lZDI1NTE5AAAAIK0wmN/Cr3JXqmLW7u+g9pTh+wyqDHpSQEIQczXkVx9q mpcvault-client-signer
```
**No password:** The key must not have a passphrase for the client signer to use it automatically.
## Step 2: Register the Client Signer in Your Vault
1. Go to [console.mpcvault.com](https://console.mpcvault.com/)
2. Navigate to your vault's **Team & policies** page
3. Click **+ New Client Signer**
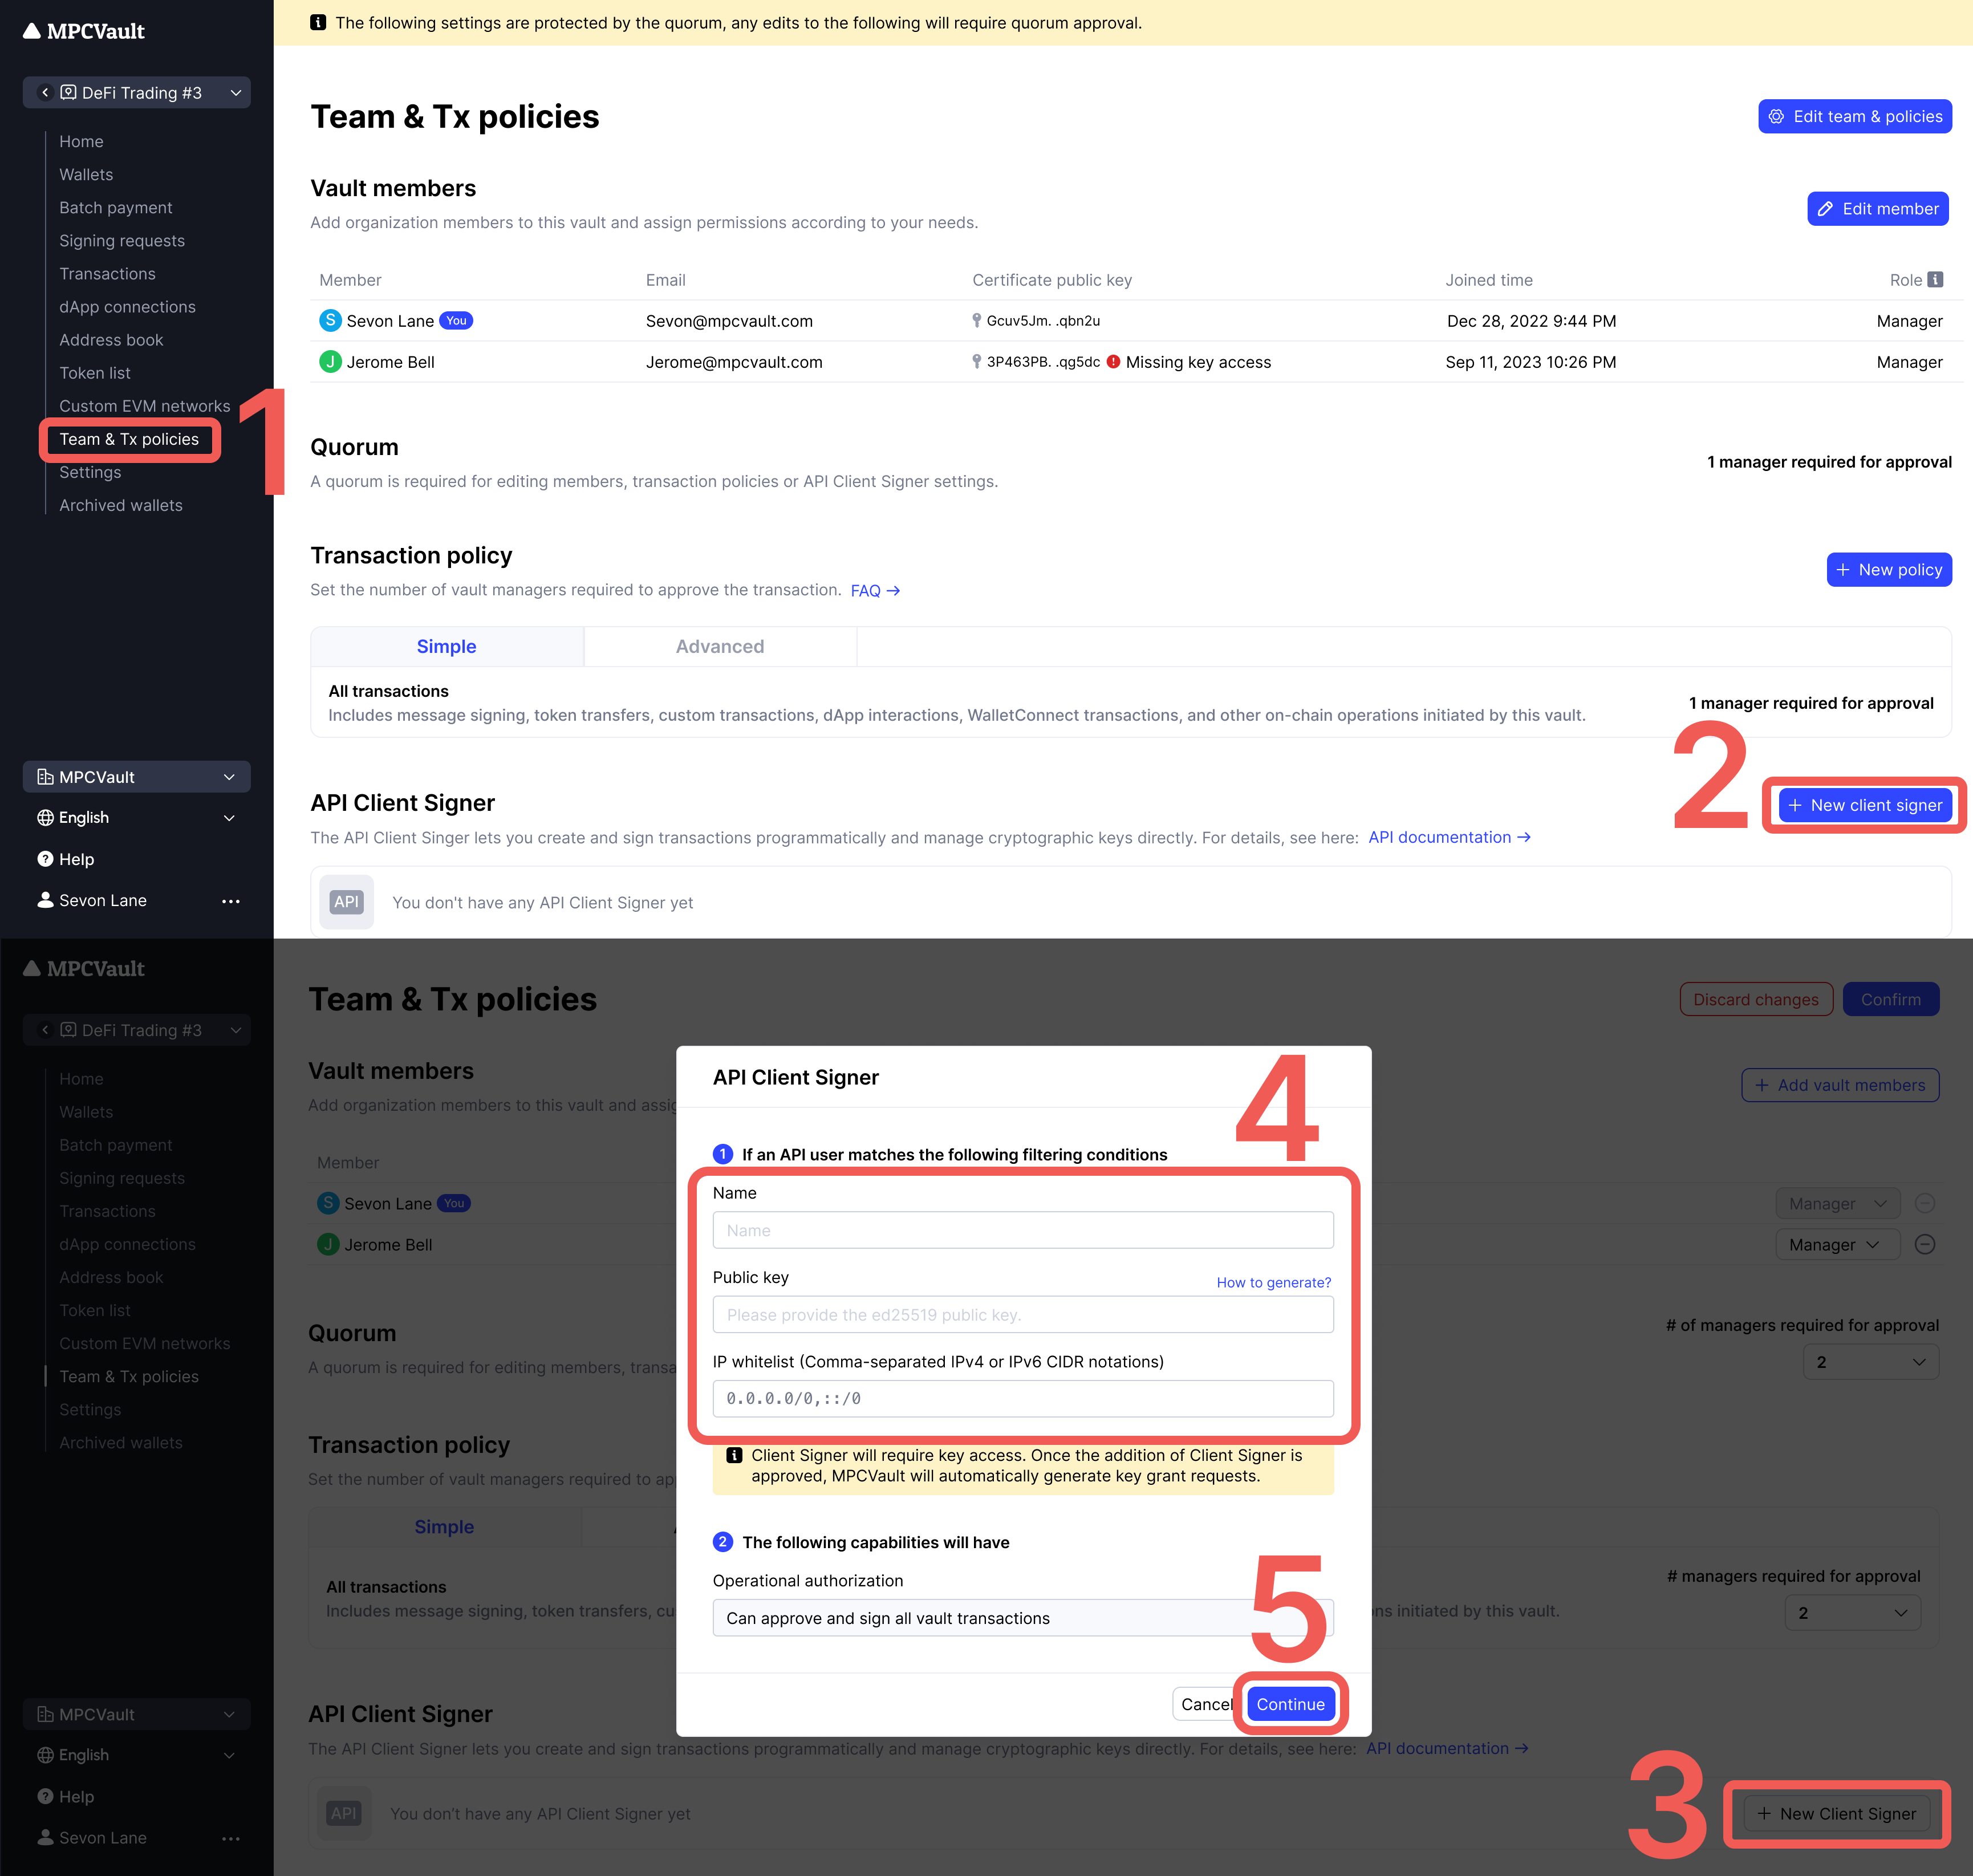 4. Enter the information:
| Field | Description |
| ------------ | ------------------------------------------------------ |
| Name | Identifier for this signer (e.g., `production-signer`) |
| Public key | Paste the contents of `client-signer-key.pub` |
| IP Whitelist | (Optional) Your server's IP addresses |
5. Click **Continue** → **Confirm** to create a signing request
6. Approve the **Vault setting update** request in the MPCVault app
## Step 3: Grant Key Access
After creating the client signer, MPCVault automatically creates a **Key grant access** signing request. This grants the client signer permission to participate in MPC signing.
Approve this request in the MPCVault app to complete setup.
**One signer per vault:** Each vault requires its own client signer. You cannot reuse the same signer across multiple vaults.
## Step 4: Create the Configuration File
Create `config.yml` with your settings:
```yaml theme={null}
# Health check endpoint for monitoring
http-health:
listening-addr: 0.0.0.0:8080
# Your vault's UUID (find in vault settings)
vault-uuid: "350063e9-xxxx-xxxx-xxxx-aaf939821815"
# Authentication
ssh:
private-key: |
-----BEGIN OPENSSH PRIVATE KEY-----
b3BlbnNzaC1rZXktdjEAAAAABG5vbmUAAAAEbm9uZQAAAAAAAAABAAAAMwAAAAtz
c2gtZWQyNTUxOQAAACCtMJjfwq9yV6pi1u7voPaU4fsMqgx6UkBCEHM15FcfagAA
AJgPBwb8DwcG/AAAAAtzc2gtZWQyNTUxOQAAACCtMJjfwq9yV6pi1u7voPaU4fsM
qgx6UkBCEHM15FcfagAAAEBKbCX7sP2Y3yL4H8Mz220wK0wmN/Cr3JXqmLW7u+g9
pTh+wyqDHpSQEIQczXkVx9qAAAAFW1wY3ZhdWx0LWNsaWVudC1zaWduZXI=
-----END OPENSSH PRIVATE KEY-----
password: ""
# Your callback endpoint
callback-url: "http://host.docker.internal:8088/api/mpcvault/callback"
```
**Configuration reference:**
| Field | Description | Example |
| ---------------------------- | ----------------------------------- | ---------------------------------- |
| `http-health.listening-addr` | Health check endpoint | `0.0.0.0:8080` |
| `vault-uuid` | UUID from vault settings page | `350063e9-...` |
| `ssh.private-key` | Full private key content | `-----BEGIN OPENSSH...` |
| `ssh.password` | Key passphrase (empty if none) | `""` |
| `callback-url` | Your backend endpoint for approvals | `http://your-server:8088/callback` |
## Step 5: Run the Client Signer
### Option A: Docker Run (Development)
```bash theme={null}
docker run -d \
--name mpcvault-signer \
--restart unless-stopped \
-p 8080:8080 \
-v $(pwd)/config.yml:/config.yml:ro \
ghcr.io/mpcvault/client-signer:latest \
--config-path=/config.yml
```
### Option B: Docker Compose (Recommended for Production)
Create `docker-compose.yml`:
```yaml theme={null}
version: '3.8'
services:
mpcvault-signer:
image: ghcr.io/mpcvault/client-signer:latest
container_name: mpcvault-signer
restart: unless-stopped
ports:
- "8080:8080"
volumes:
- ./config.yml:/config.yml:ro
command: ["--config-path=/config.yml"]
healthcheck:
test: ["CMD", "curl", "-f", "http://localhost:8080/health"]
interval: 30s
timeout: 10s
retries: 3
start_period: 10s
logging:
driver: "json-file"
options:
max-size: "10m"
max-file: "3"
```
Start with:
```bash theme={null}
docker-compose up -d
```
### Verify it's running
```bash theme={null}
# Check container status
docker ps | grep mpcvault-signer
# Check health endpoint
curl http://localhost:8080/health
# View logs
docker logs -f mpcvault-signer
```
Docker image: [ghcr.io/mpcvault/client-signer](https://github.com/orgs/mpcvault/packages/container/package/client-signer)
## Step 6: Implement Your Callback Handler
When you call `ExecuteSigningRequests`, MPCVault sends a callback to your `callback-url`. Your server must:
1. Receive the callback (POST request with protobuf body)
2. Validate the signing request against your business rules
3. Return HTTP 200 to approve, or 4xx/5xx to reject
**Example callback handler (Node.js/Express):**
```javascript theme={null}
const express = require('express');
const app = express();
// Parse raw protobuf body
app.use('/api/mpcvault/callback', express.raw({ type: '*/*' }));
app.post('/api/mpcvault/callback', async (req, res) => {
try {
// The body contains a serialized SigningRequest protobuf
const signingRequestData = req.body;
// Implement your validation logic here:
// - Check amount limits
// - Verify destination addresses
// - Apply rate limiting
// - Log for audit trail
const shouldApprove = await validateSigningRequest(signingRequestData);
if (shouldApprove) {
// Return 200 to approve the transaction
res.status(200).send('approved');
} else {
// Return 4xx to reject
res.status(403).send('rejected');
}
} catch (error) {
console.error('Callback error:', error);
res.status(500).send('error');
}
});
app.listen(8088, () => {
console.log('Callback server running on port 8088');
});
```
**Security:** Your callback endpoint should validate requests and implement appropriate access controls. Consider using request signing or IP whitelisting.
## Docker Networking
| Your Setup | Callback URL Format |
| -------------------------------------- | --------------------------------------- |
| Callback server on same host as Docker | `http://host.docker.internal:PORT/path` |
| Callback server in same Docker network | `http://service-name:PORT/path` |
| Callback server on remote host | `http://your-server.com:PORT/path` |
**`host.docker.internal`** is a special DNS name that resolves to the host machine from inside a Docker container. It works on Docker Desktop (Mac/Windows) and recent Docker Engine versions on Linux.
## How Signing Works
When you call `ExecuteSigningRequests`:
```mermaid theme={null}
sequenceDiagram
participant App as Your App
participant API as MPCVault API
participant Signer as Client Signer
participant Chain as Blockchain
App->>API: POST /signing-requests/execute
API->>Signer: Callback (SigningRequest protobuf)
Note over Signer: Your logic decides
Signer-->>API: HTTP 200 (approve)
API->>Chain: Broadcast Transaction
API-->>App: { tx_hash: "0x...", status: "completed" }
```
## Troubleshooting
| Issue | Cause | Solution |
| --------------------- | ------------------ | ------------------------------------- |
| Container won't start | Invalid config.yml | Check YAML syntax and key format |
| No callbacks received | Wrong callback URL | Use `host.docker.internal` for local |
| Connection refused | Port not exposed | Verify `-p 8080:8080` mapping |
| Auth failed | Key mismatch | Ensure public key matches private key |
| Key access denied | Missing approval | Approve **Key grant access** in app |
| Timeout | Callback too slow | Respond within 30 seconds |
| Transaction rejected | Non-200 response | Check your validation logic |
### Useful Commands
```bash theme={null}
# Check signer logs
docker logs -f mpcvault-signer
# Restart signer
docker restart mpcvault-signer
# Check health
curl http://localhost:8080/health
# Test callback endpoint
curl -X POST http://localhost:8088/api/mpcvault/callback \
-H "Content-Type: application/octet-stream" \
-d "test"
```
4. Enter the information:
| Field | Description |
| ------------ | ------------------------------------------------------ |
| Name | Identifier for this signer (e.g., `production-signer`) |
| Public key | Paste the contents of `client-signer-key.pub` |
| IP Whitelist | (Optional) Your server's IP addresses |
5. Click **Continue** → **Confirm** to create a signing request
6. Approve the **Vault setting update** request in the MPCVault app
## Step 3: Grant Key Access
After creating the client signer, MPCVault automatically creates a **Key grant access** signing request. This grants the client signer permission to participate in MPC signing.
Approve this request in the MPCVault app to complete setup.
**One signer per vault:** Each vault requires its own client signer. You cannot reuse the same signer across multiple vaults.
## Step 4: Create the Configuration File
Create `config.yml` with your settings:
```yaml theme={null}
# Health check endpoint for monitoring
http-health:
listening-addr: 0.0.0.0:8080
# Your vault's UUID (find in vault settings)
vault-uuid: "350063e9-xxxx-xxxx-xxxx-aaf939821815"
# Authentication
ssh:
private-key: |
-----BEGIN OPENSSH PRIVATE KEY-----
b3BlbnNzaC1rZXktdjEAAAAABG5vbmUAAAAEbm9uZQAAAAAAAAABAAAAMwAAAAtz
c2gtZWQyNTUxOQAAACCtMJjfwq9yV6pi1u7voPaU4fsMqgx6UkBCEHM15FcfagAA
AJgPBwb8DwcG/AAAAAtzc2gtZWQyNTUxOQAAACCtMJjfwq9yV6pi1u7voPaU4fsM
qgx6UkBCEHM15FcfagAAAEBKbCX7sP2Y3yL4H8Mz220wK0wmN/Cr3JXqmLW7u+g9
pTh+wyqDHpSQEIQczXkVx9qAAAAFW1wY3ZhdWx0LWNsaWVudC1zaWduZXI=
-----END OPENSSH PRIVATE KEY-----
password: ""
# Your callback endpoint
callback-url: "http://host.docker.internal:8088/api/mpcvault/callback"
```
**Configuration reference:**
| Field | Description | Example |
| ---------------------------- | ----------------------------------- | ---------------------------------- |
| `http-health.listening-addr` | Health check endpoint | `0.0.0.0:8080` |
| `vault-uuid` | UUID from vault settings page | `350063e9-...` |
| `ssh.private-key` | Full private key content | `-----BEGIN OPENSSH...` |
| `ssh.password` | Key passphrase (empty if none) | `""` |
| `callback-url` | Your backend endpoint for approvals | `http://your-server:8088/callback` |
## Step 5: Run the Client Signer
### Option A: Docker Run (Development)
```bash theme={null}
docker run -d \
--name mpcvault-signer \
--restart unless-stopped \
-p 8080:8080 \
-v $(pwd)/config.yml:/config.yml:ro \
ghcr.io/mpcvault/client-signer:latest \
--config-path=/config.yml
```
### Option B: Docker Compose (Recommended for Production)
Create `docker-compose.yml`:
```yaml theme={null}
version: '3.8'
services:
mpcvault-signer:
image: ghcr.io/mpcvault/client-signer:latest
container_name: mpcvault-signer
restart: unless-stopped
ports:
- "8080:8080"
volumes:
- ./config.yml:/config.yml:ro
command: ["--config-path=/config.yml"]
healthcheck:
test: ["CMD", "curl", "-f", "http://localhost:8080/health"]
interval: 30s
timeout: 10s
retries: 3
start_period: 10s
logging:
driver: "json-file"
options:
max-size: "10m"
max-file: "3"
```
Start with:
```bash theme={null}
docker-compose up -d
```
### Verify it's running
```bash theme={null}
# Check container status
docker ps | grep mpcvault-signer
# Check health endpoint
curl http://localhost:8080/health
# View logs
docker logs -f mpcvault-signer
```
Docker image: [ghcr.io/mpcvault/client-signer](https://github.com/orgs/mpcvault/packages/container/package/client-signer)
## Step 6: Implement Your Callback Handler
When you call `ExecuteSigningRequests`, MPCVault sends a callback to your `callback-url`. Your server must:
1. Receive the callback (POST request with protobuf body)
2. Validate the signing request against your business rules
3. Return HTTP 200 to approve, or 4xx/5xx to reject
**Example callback handler (Node.js/Express):**
```javascript theme={null}
const express = require('express');
const app = express();
// Parse raw protobuf body
app.use('/api/mpcvault/callback', express.raw({ type: '*/*' }));
app.post('/api/mpcvault/callback', async (req, res) => {
try {
// The body contains a serialized SigningRequest protobuf
const signingRequestData = req.body;
// Implement your validation logic here:
// - Check amount limits
// - Verify destination addresses
// - Apply rate limiting
// - Log for audit trail
const shouldApprove = await validateSigningRequest(signingRequestData);
if (shouldApprove) {
// Return 200 to approve the transaction
res.status(200).send('approved');
} else {
// Return 4xx to reject
res.status(403).send('rejected');
}
} catch (error) {
console.error('Callback error:', error);
res.status(500).send('error');
}
});
app.listen(8088, () => {
console.log('Callback server running on port 8088');
});
```
**Security:** Your callback endpoint should validate requests and implement appropriate access controls. Consider using request signing or IP whitelisting.
## Docker Networking
| Your Setup | Callback URL Format |
| -------------------------------------- | --------------------------------------- |
| Callback server on same host as Docker | `http://host.docker.internal:PORT/path` |
| Callback server in same Docker network | `http://service-name:PORT/path` |
| Callback server on remote host | `http://your-server.com:PORT/path` |
**`host.docker.internal`** is a special DNS name that resolves to the host machine from inside a Docker container. It works on Docker Desktop (Mac/Windows) and recent Docker Engine versions on Linux.
## How Signing Works
When you call `ExecuteSigningRequests`:
```mermaid theme={null}
sequenceDiagram
participant App as Your App
participant API as MPCVault API
participant Signer as Client Signer
participant Chain as Blockchain
App->>API: POST /signing-requests/execute
API->>Signer: Callback (SigningRequest protobuf)
Note over Signer: Your logic decides
Signer-->>API: HTTP 200 (approve)
API->>Chain: Broadcast Transaction
API-->>App: { tx_hash: "0x...", status: "completed" }
```
## Troubleshooting
| Issue | Cause | Solution |
| --------------------- | ------------------ | ------------------------------------- |
| Container won't start | Invalid config.yml | Check YAML syntax and key format |
| No callbacks received | Wrong callback URL | Use `host.docker.internal` for local |
| Connection refused | Port not exposed | Verify `-p 8080:8080` mapping |
| Auth failed | Key mismatch | Ensure public key matches private key |
| Key access denied | Missing approval | Approve **Key grant access** in app |
| Timeout | Callback too slow | Respond within 30 seconds |
| Transaction rejected | Non-200 response | Check your validation logic |
### Useful Commands
```bash theme={null}
# Check signer logs
docker logs -f mpcvault-signer
# Restart signer
docker restart mpcvault-signer
# Check health
curl http://localhost:8080/health
# Test callback endpoint
curl -X POST http://localhost:8088/api/mpcvault/callback \
-H "Content-Type: application/octet-stream" \
-d "test"
```