Client Signer
The Client Signer allows you to programmatically complete signing requests and directly manage the underlying cryptographic key shares. Use it with the API to automate transaction signing workflows in your own infrastructure — ideal for bots, backend services, and batch processing.
Get started in 5 steps
- Enable API and get an API token
- Enable and configure the Client Signer in MPCVault
- Grant key access to the Client Signer
- Deploy and run the Client Signer
- Sign transactions via Client Signer
Step 1: Enable API and Get API token
To interact with the Client Signer, you first need an API token with appropriate permissions.
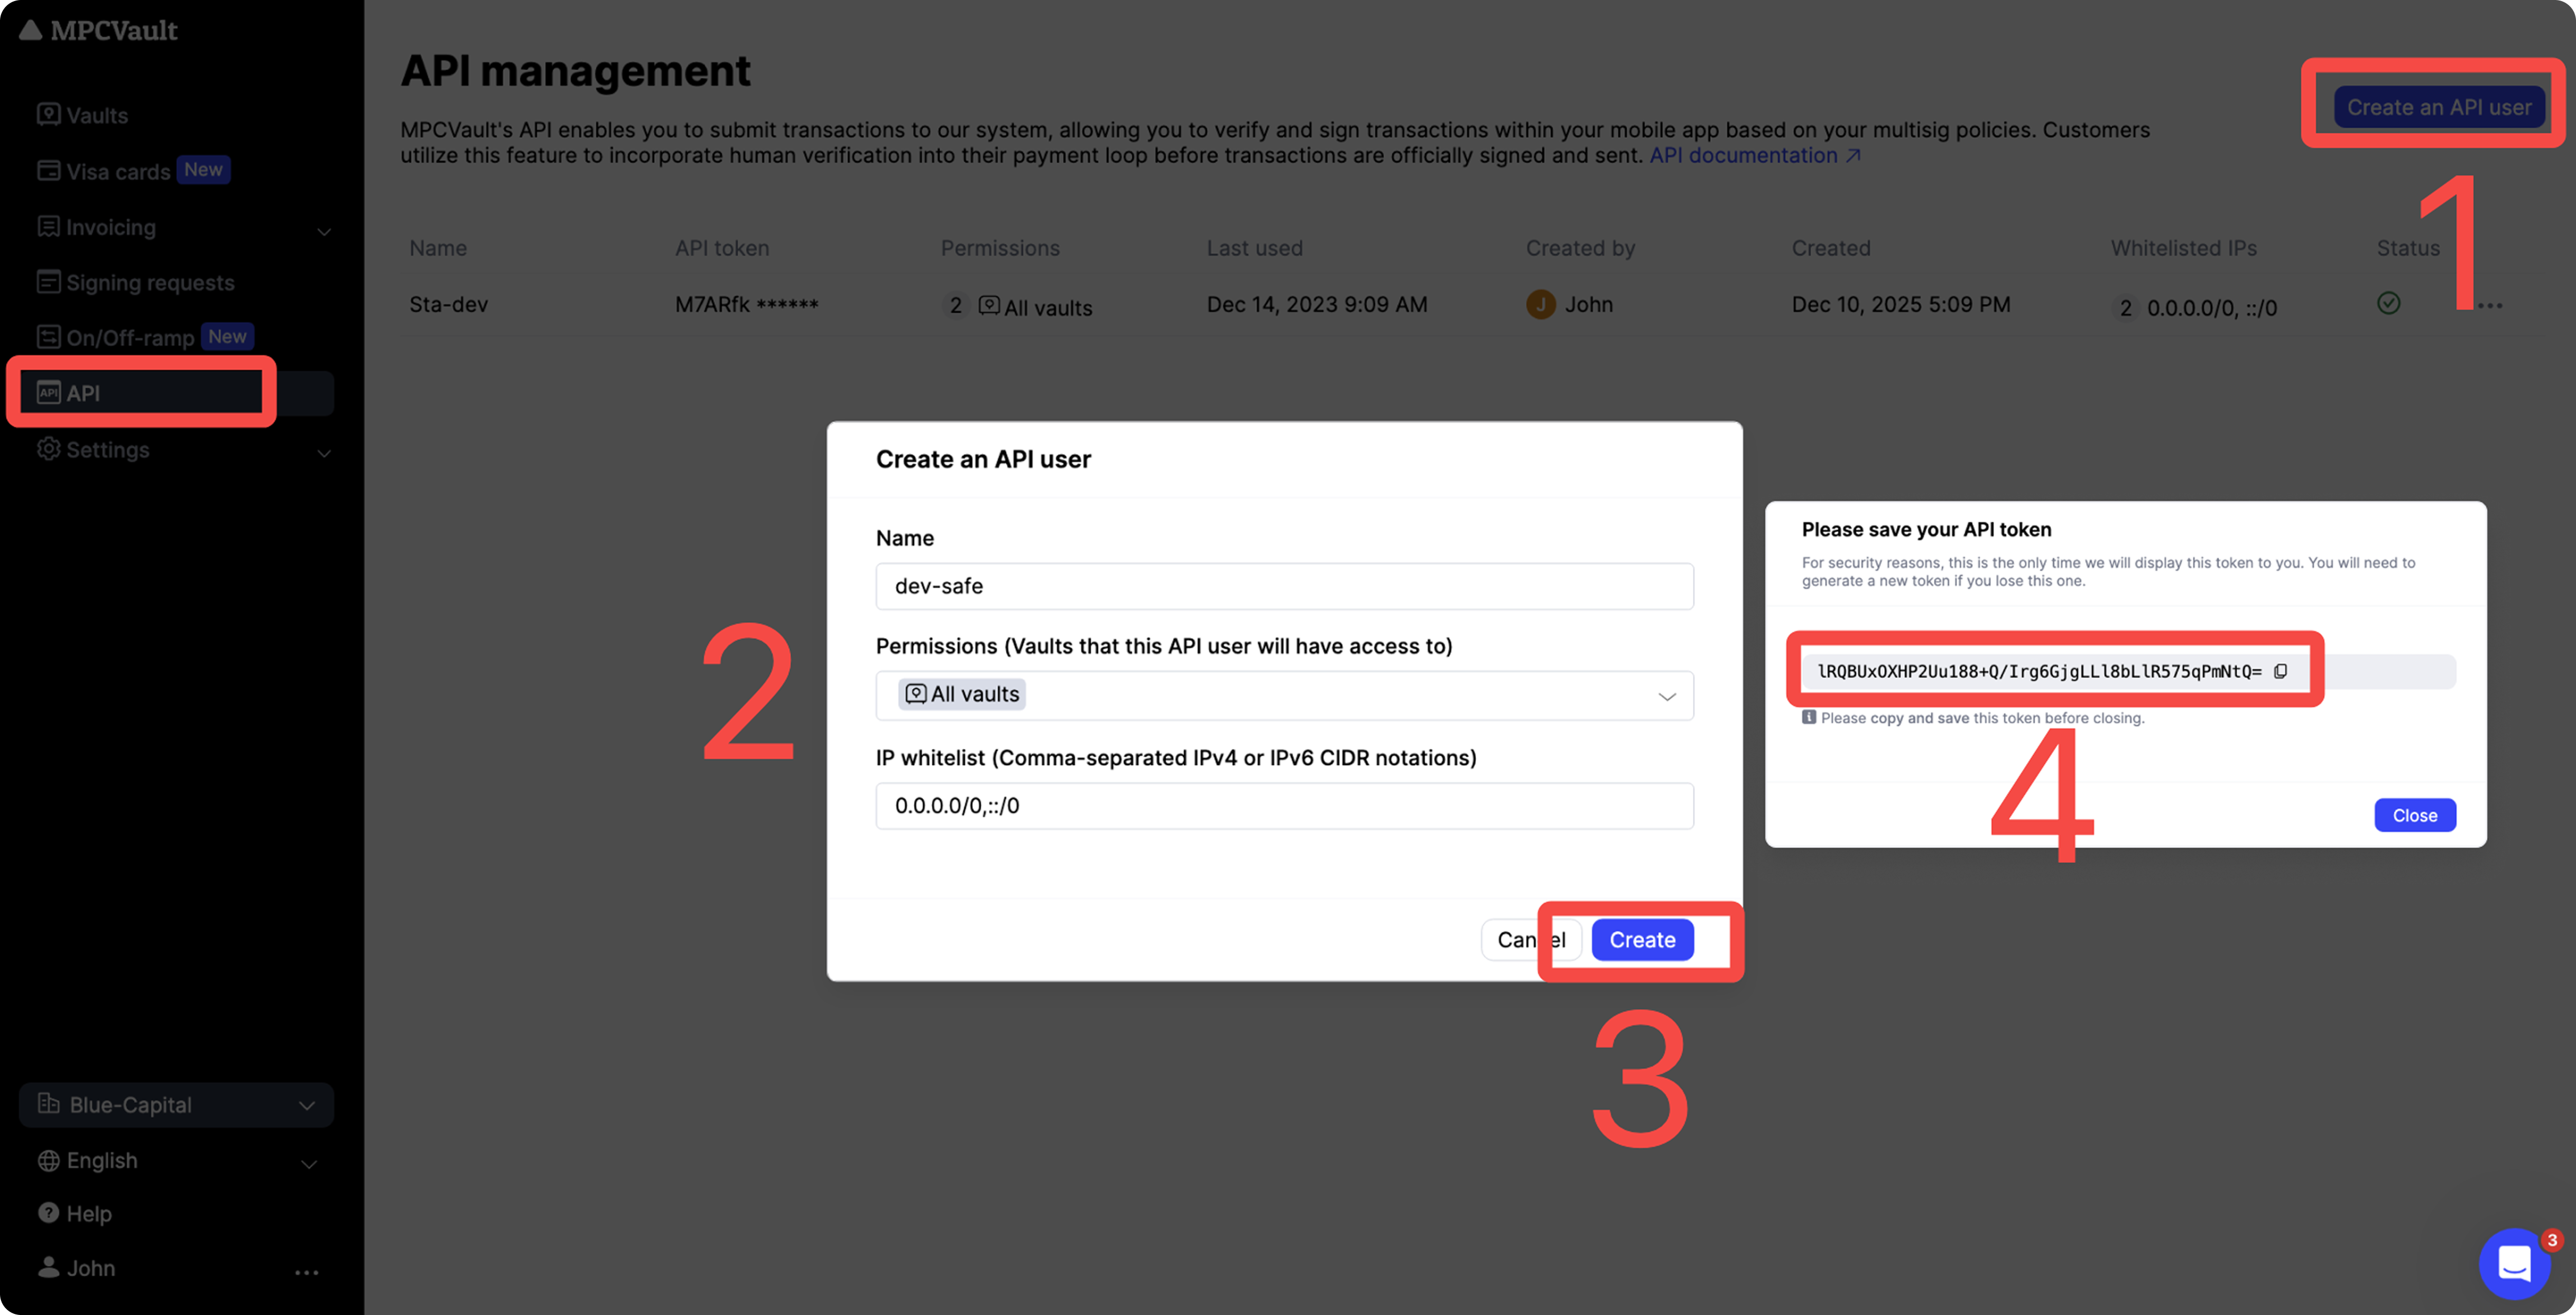
- Log in to the MPCVault Web Console as an organization admin.
- Navigate to the API page and click Create an API user.
- Fill in:
- Name: Enter a unique name for this API user.
- Permission: Select the vaults this API user can access.
- IP whitelist: Add allowed IPv4/IPv6 CIDR ranges.
- Click Create. Copy the token from the one-time popup and store it securely.
- For security reasons, this token is only shown once.
- If lost, you will need to generate a new one.
- Keep this token secret at all times — use env vars or secret manager.
- Never hardcode it, commit it to Git, or share it.
- If exposed, delete the API user immediately from the API page.
Step 2: Enable and configure the Client Signer in MPCVault
Preparation
Generate an Ed25519 key pair for Client Signer authentication:
- Open a terminal.
- Run the following command, replacing
[key_name]:ssh-keygen -t ed25519 -C "[key_name]" - Choose a location to save the keys.
- Do not set a password when prompted.
- Keep the private key securely — it is required for Step 4.
- Copy the contents of the generated public key (
.pubfile), which should look like:ssh-ed25519 AAAAC3NzaC1lZDI1NTE5AAAAIK0wmN/Cr3JXqmLW7u+g9pTh+wyqDHpSQEIQczXkVx9q [key_name]
Enable
Configure the Client Signer in MPCVault:
- In the MPCVault Web Console , open your target vault and go to Team & Tx policies page.
- Click + New Client Signer to enter edit mode.
- Click + New Client Signer again to add a new signer.
- Enter the required info (including the public key from above) and click Continue.
- Submit the Vault setting update request by clicking Confirm (top right).
- Approve the request using the MPCVault mobile app.
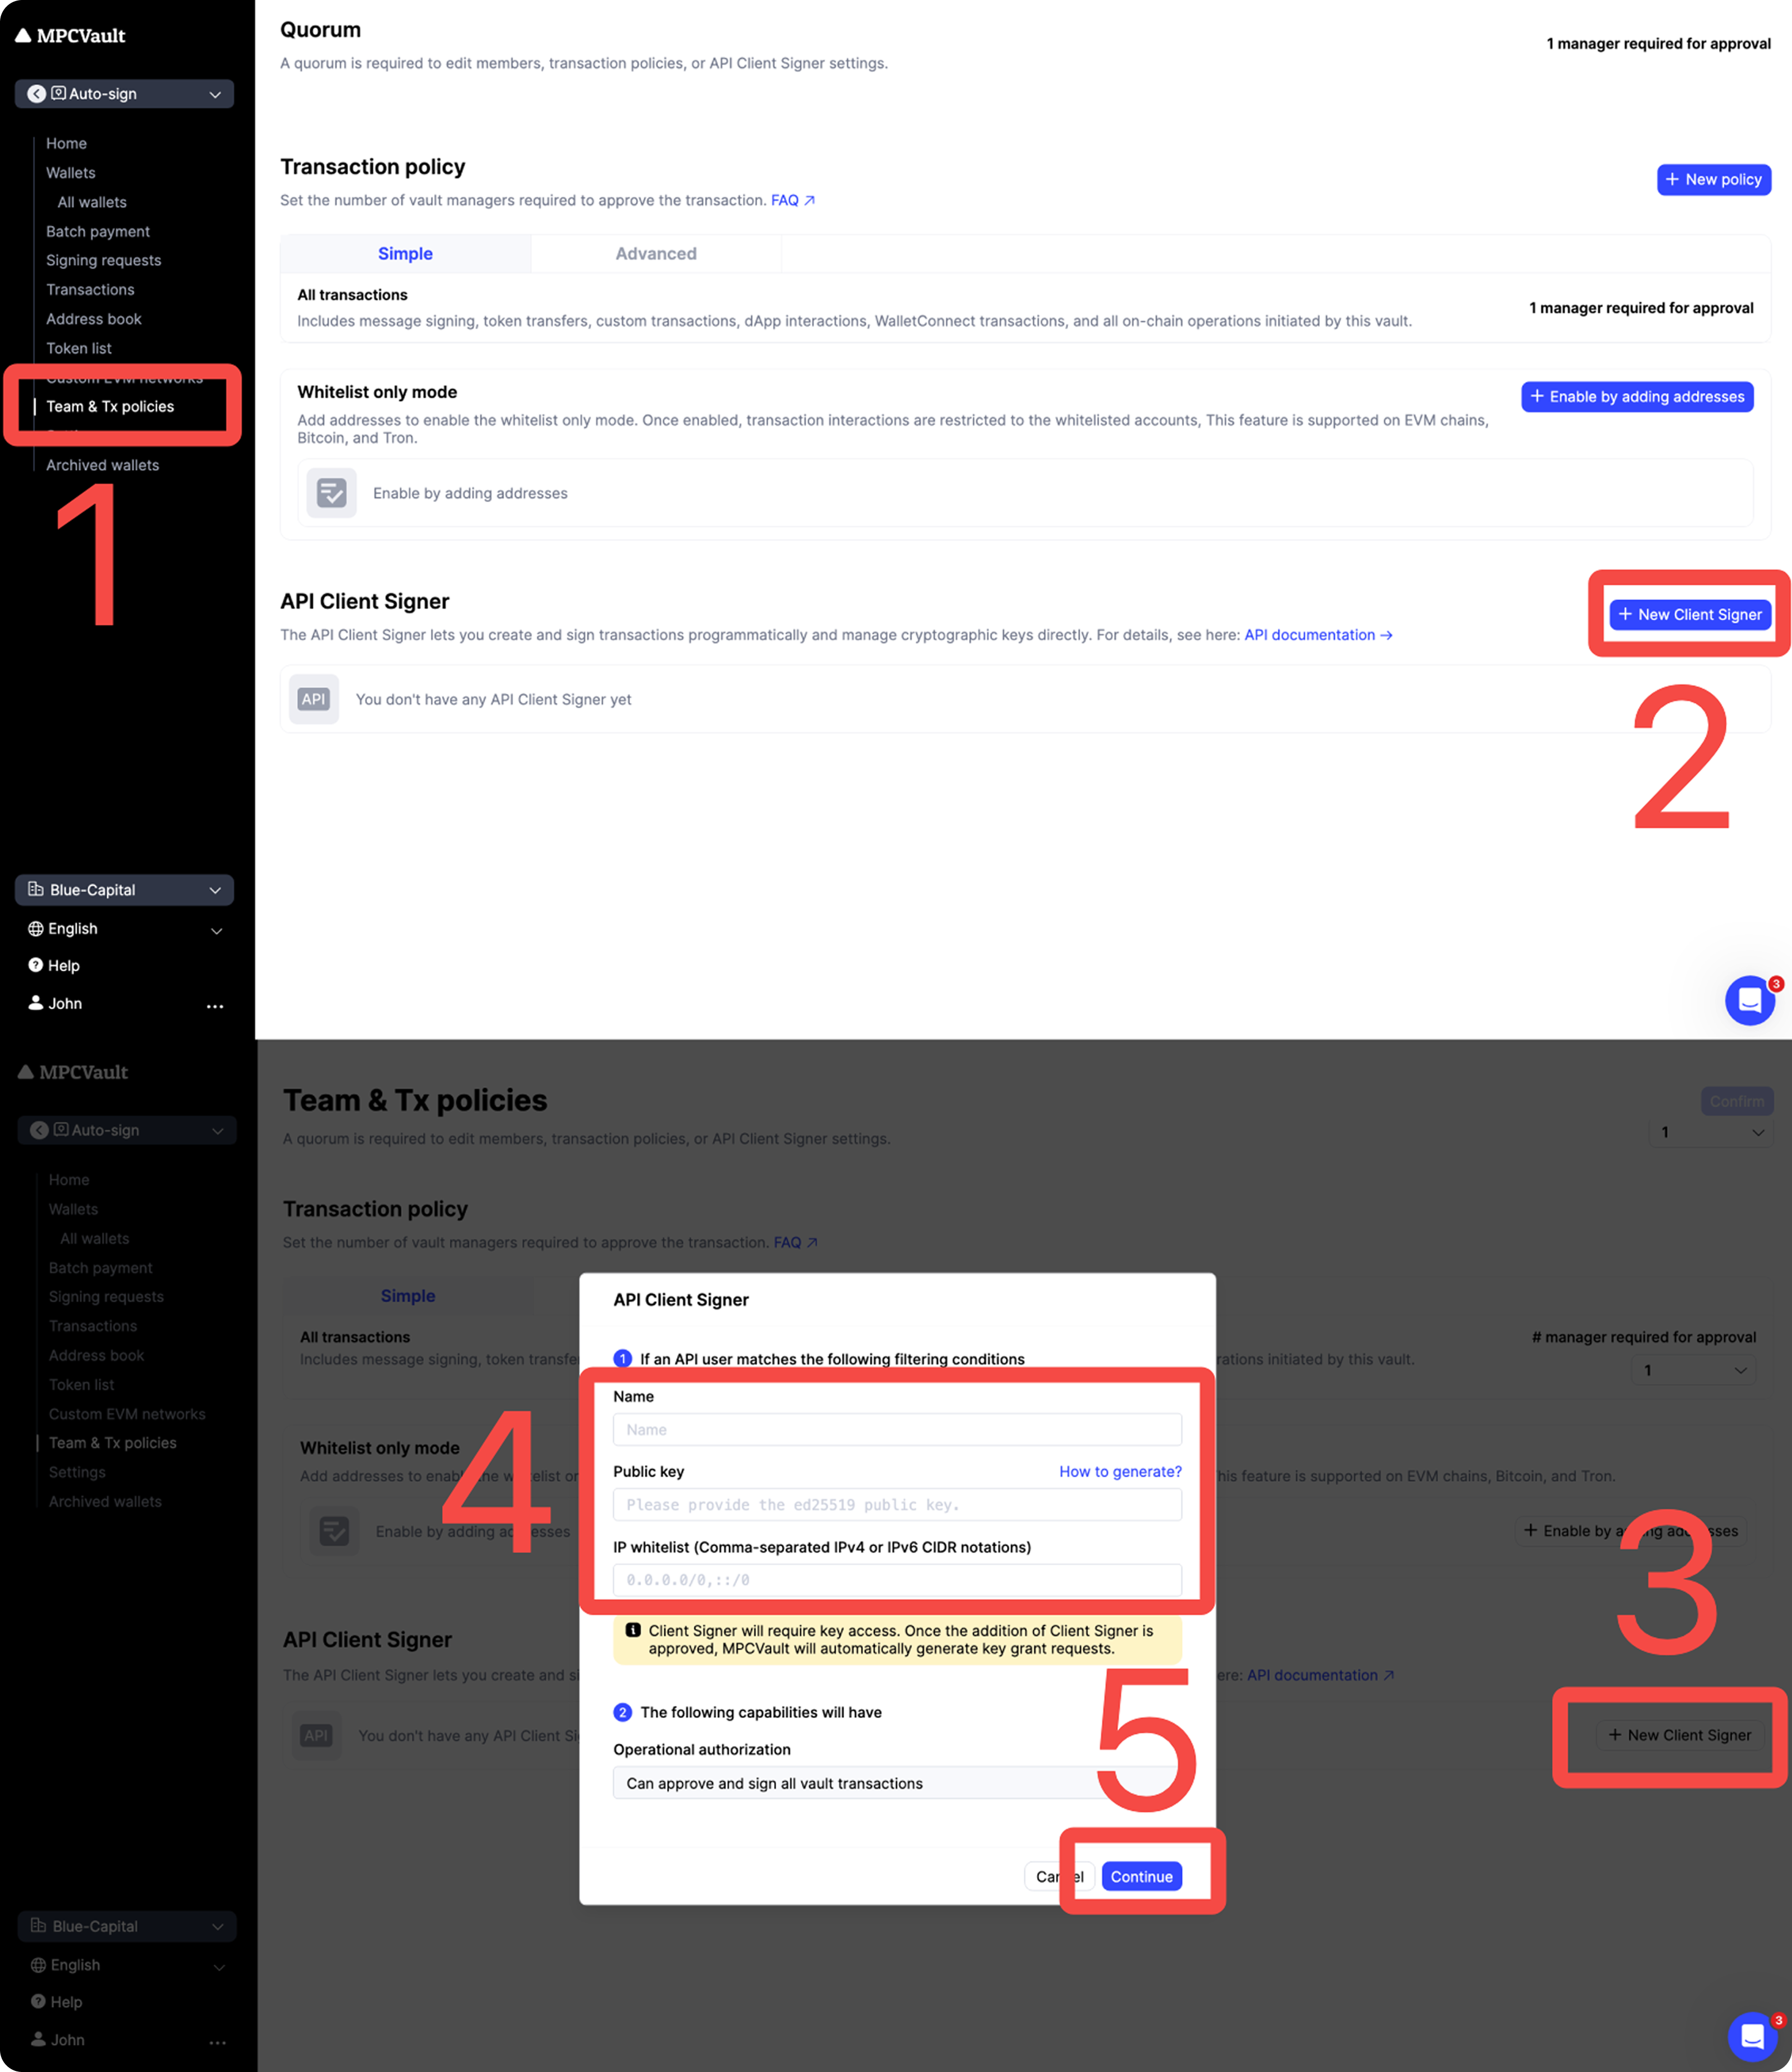
The same API Client Signer cannot be used across different vaults. If you need to use it in multiple vaults, add a different API Client Signer for each vault.
Step 3: Grant key access to the Client Signer
After completing Step 2, MPCVault automatically creates a “Grant key access” request.
- Approve and sign this request in the MPCVault mobile app.
- Once authorized, the Client Signer can access vault key shares and perform signing operations.
Step 4: Deploy and run the Client Signer
The MPCVault Client Signer is distributed as a Docker Image: Client Signer Docker Image
-
Install Docker and pull image
docker pull ghcr.io/mpcvault/client-signer:latest -
Create a
config.ymlfile with your vault and signer credentials. Example:http-health: listening-addr: localhost:8080 # Address to listen on for exposing health check endpoint vault-uuid: 350063e9-1234-1234-ae54-aaf939821815 # Your own vault UUID for signing ssh: private-key: | # Private key for your Client Signer (generated in Step 2) -----BEGIN OPENSSH PRIVATE KEY----- WJDmz0bAAAAkKYeHKWr/4fZWLsVWFAKERAAAkKYeHKWr/4fZWLsVWJDmz0bAAAAkKYeH WJDmz0bAAAAkKYeHKWr/4fZWLsVWJDmz0bAAAAkKYeHKWr/4fZWLsVWJDmz0bAAAAkKYeH WJDmz0bAAAAkKYeHKWr/4fZWLsVWJDmz0bAAAAkKYeHKWr/4fZWLsVWJDmz0bAAAAkKYeH njJbsYDOxrEym+WJDmz0bAAAAkKYeHKWr/4fZWLsVWJDmz0bAAAAkKYeHKWr/4fZWLsVWJ WJDmz0bAAAAkKYeHKWr/4fZWLsVWJDmz0bAAAAkKYeHKWr/4fZWLsVWJDmz0bAAAAkKYeH sP2Y3yL4H8Mz220w== -----END OPENSSH PRIVATE KEY----- password: "" # Password for the private key. Leave empty if there is no password callback-url: "http://host.docker.internal:8088/callback" # callback URL for the vault to call when getting a request to complete a signing request.Note: On macOS/Windows (Docker Desktop), use
host.docker.internalto reach services on your host.
Example callback:http://host.docker.internal:8088/callbackOn Linux, use
--network=hostor your host’s actual IP. More info: StackOverflow: Docker host IP from inside container -
Start the Client Signer
sudo docker run -it -p 8080:8080 {path to your config.yml}:/config.yml ghcr.io/mpcvault/client-signer --config-path=/config.yml
The Client Signer is now running and ready to handle signing requests for your vault.
Step 5: Sign transactions via Client Signer
-
Implement your callback service
Implement an HTTP callback service to handle signing approval requests triggered by
ExecuteSigningRequests.- When you call
ExecuteSigningRequests, the Client Signer sends a callback request to your callback endpoint. - The request body is a serialized protobuf
SigningRequest. - Your service must respond with HTTP 200 to approve the signing request. Any non-200 response will reject it.
- After the callback is approved, the
ExecuteSigningRequestscall completes and returns the signing response.
Example callback handler in Go:
func callback(sr *apipb.SigningRequest) error { srBytes, err := proto.Marshal(sr) if err != nil { return err } code, err := Post(callbackURL, srBytes, nil) if err != nil { return err } if code != http.StatusOK { return fmt.Errorf("callback status code: %v", code) } return nil } - When you call
-
Create and execute signing requests
- Start your callback service before creating signing requests.
- Use the MPCVault API to create signing requests in your application and call
ExecuteSigningRequests. - Each signing request will be sent to your callback service for approval.
- After your callback service responds with HTTP 200, the Client Signer proceeds with signing and the API returns the signed transaction details.
Integrate this flow into your business logic to automate transaction signing while maintaining control via your callback.